How to Create an Ecommerce website with WordPress in Easy Steps ( No Coding )
Do you want to start your own ecommerce website and sell products online but don’t know how to get started. We have done several client projects by creating awesome ecommerce websites and have found that non-techie faces lots of difficulties when creating a ecommerce store.
So in this tutorial, we will learn how to create an ecommerce website with wordpress easily without writing a piece of code. And we created this tutorial after helping hundreds of users and clients start their own e-commerce store.
Easy Steps to Create an Ecommerce Website with WordPress
- Getting a Domain.
- Getting the best and fastest WordPress hosting for eCommerce.
- Installing WordPress.
- Getting Free SSL.
- Installing a Free eCommerce plugin.
- Installing A Responsive Free Theme.
- Installing Recommended Plugins.
- Setting up WordPress security.
- Setting up eCommerce SEO.
- Setting up The E-Commerce Plugin.
- Installing a payment gateway.
- Shipping Setup.
- Paypal payment integration.
- Stripe payment integration.
- Razorpay payment integration.
- Creating our First Product.
- Understanding Different types of Product.
- Managing Orders.
- Fulfilling and Processing Orders.
So these are the few things that we are going to cover while creating an eCommerce website. The entire step that we have mentioned in this article is covered in this video so you can learn how to create an eCommerce website easily with this step by step Video and Guide.
To create this E-commerce website you don’t need to have the following.
- Coding and programming Knowledge.
- Any High-End computer.
- Thousands of dollars create an eCommerce website.
We will cover the best method that we as a professional use create eCommerce website and the best part is that this guide is written by WordPress Experts From GloriousThemes.com
So let’s get started with building our eCommerce website.
Disclosure: I may receive affiliate compensation for some of the links below at no cost to you if you decide to purchase a paid plan. You can read our affiliate disclosure in our privacy policy.
Video Tutorial
If you want more information or want a helping hand from us, then continue reading and comment down your problem.
Need a Helping Hand
For this Tutorial, We have teamed up with the WordPress Experts from GloriousThemes. If you want to hire their experts and build your own eCommerce website use the coupon code “BloggerSprout20” to get 20% Discount on their services.
Visit www.GloriousThemes.com
[convertkit]
1. Getting a Domain
The first step is to get a domain name for your eCommerce website. a domain name is basically the address for your website, something like this (www.GloriousThemes.com)
There are several ways to buy a domain name and even some hosting providers give you a domain name for free. But the domain is free for just one year. From the second year you will have to pay heavy renewal prices and you will not have complete freedom and access to your domain name.

So we always suggest you buy a great and perfect domain name from NameCheap. NameCheap provides you best domain facilities like spam protection for free, privacy protection and the option to choose a premium DNS to speed up your load time.
You can buy a domain name 60% discount from NameCheap. Click the below button to visit and buy your perfect domain name.
Learn How To Choose A Domain Name for your eCommerce.
2. Getting the best and fastest WordPress Hosting for eCommerce
After buying your perfect domain name you need to get the best and the fastest wordpress hosting at the best price for your eCommerce Store.
I personally use and recommend this Two hostings
- Bluehost ( 66% Discount on Hostings)
- Siteground

These two hostings also provide Free SSL Certificate (https). Both of this hosting provide great performance, speed and reliability for eCommerce Store and our websites are mostly hosted on these two platforms.
In this tutorial, we will use Bluehost to set up our E-commerce website with WordPress.
Click this link to get Bluehost eCommerce hosting at a 60% discount. or you can click the button below.
Choose the perfect plan that suits you and purchase the hosting plan for a minimum of 3 years. This will allow you to get the best pricing from the hosting provider.
Fill in your account details information and your billing information and proceed to pay. Once the payment is complete, log in to your BlueHost account to install WordPress.
3. Installing WordPress
Installing WordPress just takes about five in Bluehost. To install WordPress visit my.bluehost.com and login to your account.
If you are using any other hosting provider the steps are the same, just login to your hosting account.
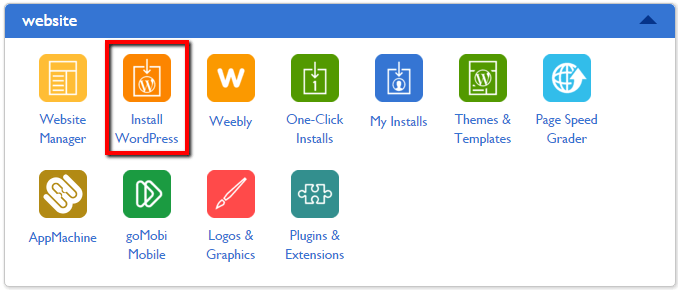
Next visit cPanel and search for WordPress. In Bluehost, you will find it under My Sites.
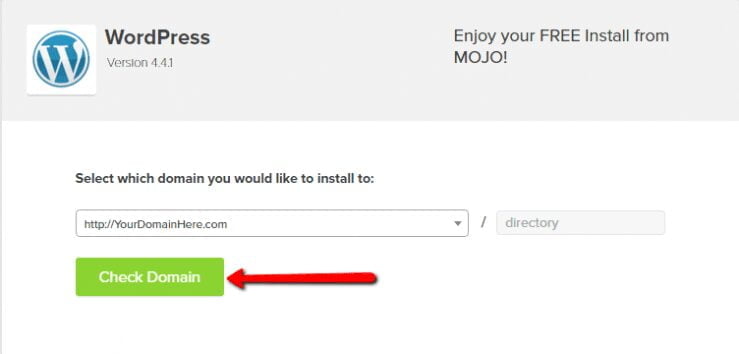
Click on the WordPress icon to install WordPress. Next, choose your domain name in which you want to install WordPress.
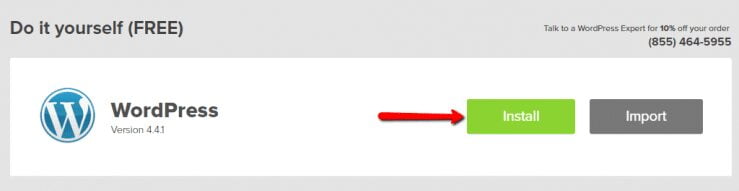
After selecting the domain name to fill the WordPress credentials like the Email, username, and password.
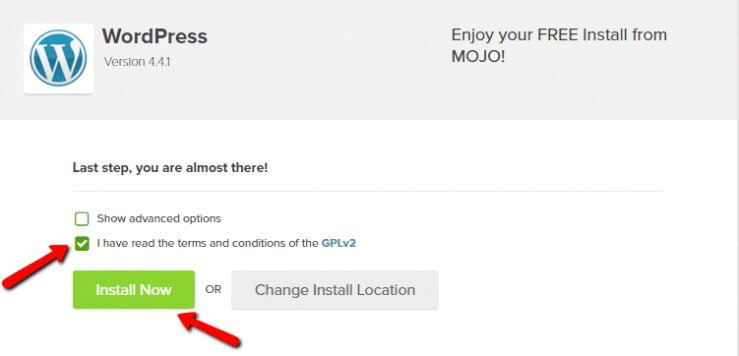
Next click on the install WordPress button. The installer will take about 2 minutes and install a fresh copy of WordPress for you.
That’s it, your WordPress is installed. All you need to do is to log in to your WordPress admin dashboard.
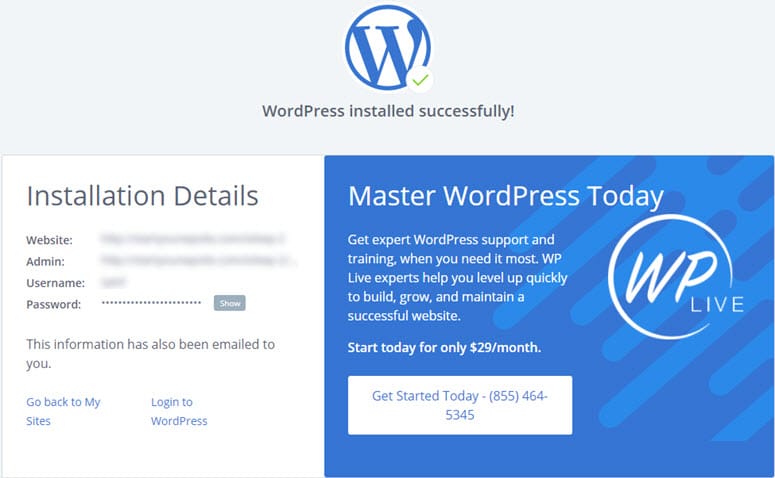
To login to your WordPress admin dashboard, type your domain name and add /wp-admin at the end.
It will look something like this.
www.yourwebsite.com/wp-admin
Fill in your username and password and click on the login button.
The next step is getting a free ssl for your website.
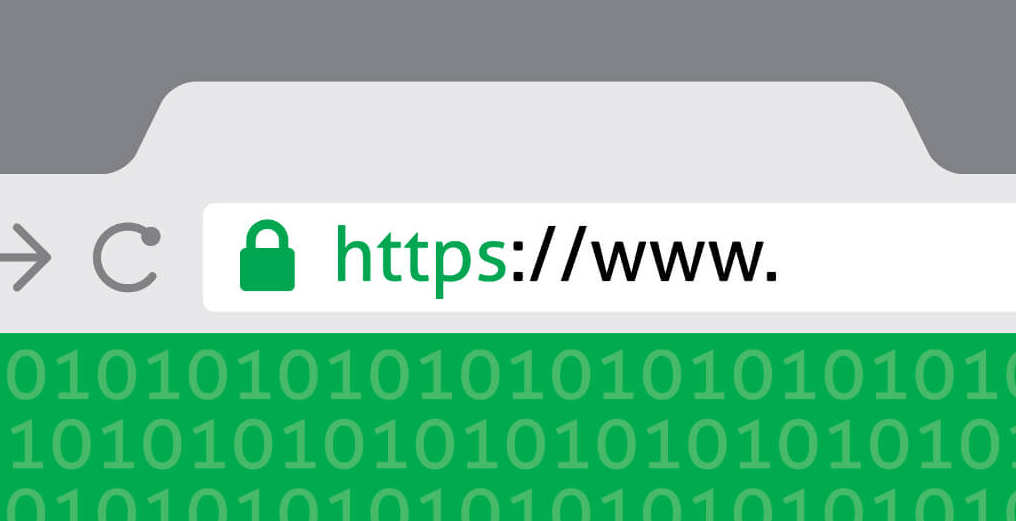
4. Getting Free SSL
If you are using Bluehost or siteground hosting for your ecommerce store then you will get a free ssl certificate.
In Bluehost, the SSL certificate is automatically created and assigned to your domain name when you install a WordPress.

To check whether your SSL is working or not. Open a new tab and type your website URL starting with https. Something like this https.//www.yourwebsite.com
If the website loads properly and the URL address bar shows you a padlock in yellow or green then the SSL is working. Now all you need to do is to activate the SSL from your WordPress admin.
Adding SSL to WordPress
login to your WordPress admin and go to settings > general. There you will find WordPress Address (URL) and Site Address (URL).
Add the https:// to the beginning of your website address and click on the Save button.
As soon as you click the save button you will be logged out and redirected to the login page with https:// SSL activated.
Next, we need to install an SSL Plugin so that our entire site uses the SSL certificate. We will cover this in Step: 7 – Installing recommended Plugin.
[convertkit]
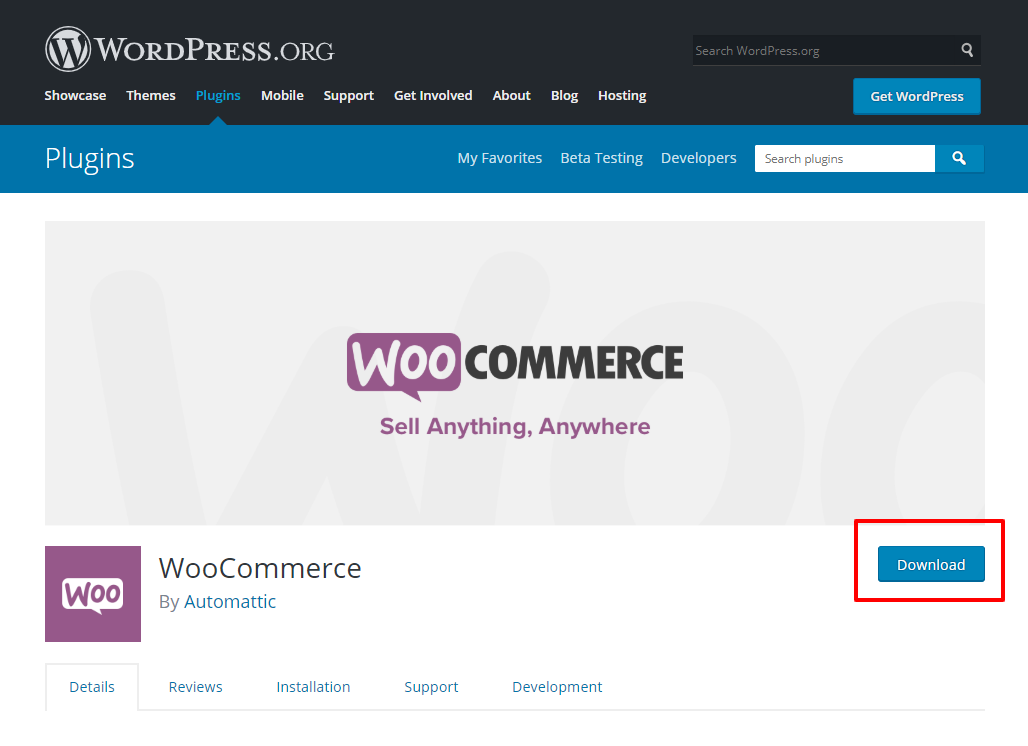
5. Installing a Free eCommerce plugin
The best eCommerce plugin for WordPress is WooCommerce. Woocommerce is the official plugin by WordPress creators and is FREE to use.
WooCommerce allows you to sell Physical products, Digital products, bundled products, and External Affiliate products.
To install WooCommercefor free. Log in to WordPress admin and go to Plugins > Add New > Search > WooCommerce.
Click on the install and activate.
Your WooCommerce is installed but it is not yet configured. You need to configure it to start using it. We will cover how to set up your WooCommerce plugin like a professional in Step: 10. Since there are other important things to do before setting WooCommerce.
6. Installing Responsive Free Theme
To use woocommerce and display products to your customers is the best possible way, you need to use a woocommerce theme.
GloriousThemes.com has Best woocommerce themes that are Beautiful, Speed and fully customizable but those themes are Premium themes.

Since in this tutorial we will be using free themes, to install a free ecommerce theme. Go to wp-admin > themes > add new > search > Astra
Click on install and activate.
After installing astra, you need to install a plugin called starter sites. To install it go to wp-admin > themes > astra options > and click on install starter sites templates from the sidebar. (See the image below)
Once you have installed that plugin, you will have a huge library of premium store designs ready to be used for your ecommerce store.
Now you will find a new option under Appearance, called starter templates.
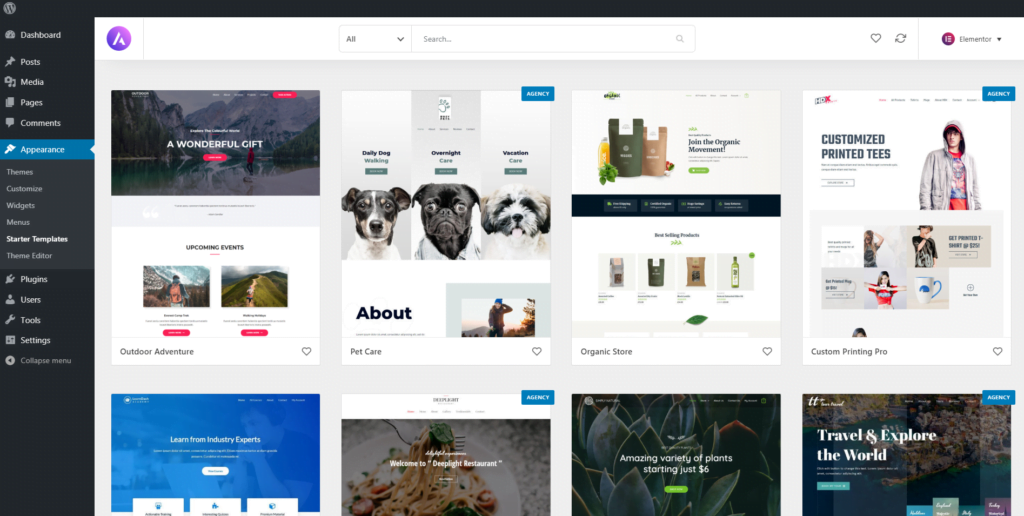
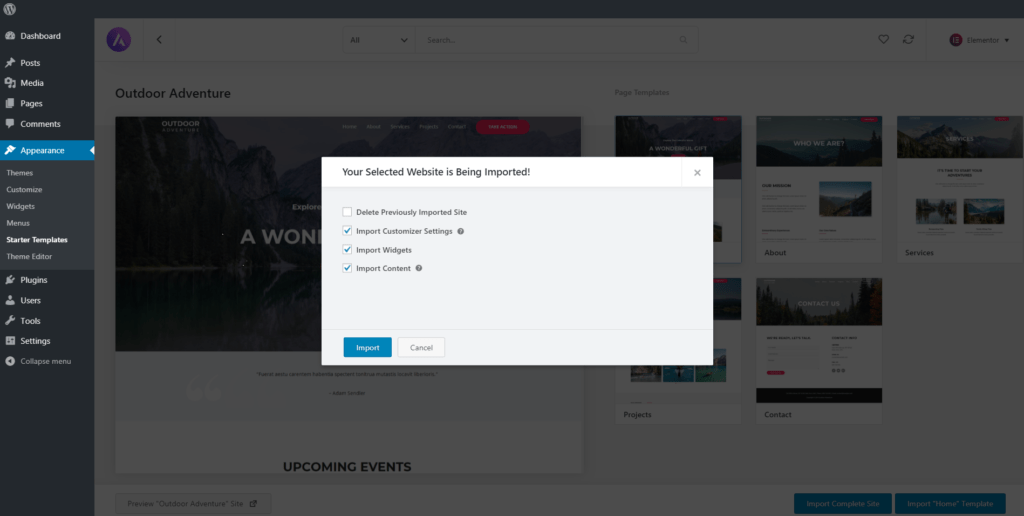
Click on it and you will be redirected to a page with several designs ready to import. Click on the design you like and press the import button.
The importer will take a few minutes as it will download all the resources like design, images and other settings for your website.
After the import has completed successfully, you will find that your website looks exactly like the demo that was shown in the plugin.
You can customize the templates using an elementor builder. As astra templates use elementor, this enables you to use elementor and customize and change anything you want in your store.
7. Installing Recommended Plugins
As now your woocommerce store has started to look like a professional store, you will need some extra features that enable you to use your ecommerce store like a company does.
These features are free and paid, we have listed below the plugins that you must install as them are very important for your website.
Free plugins
- Akismet
- RankMath
- Elementor
- Really Simple SSL
- Wordfence
- Sucuri
- UpdraftPlus
- Smush by WPMU DEV
- WooCommerce PayPal
- WooCommerce Stripe
- RazorPay for WooCommerce ( India Only)
- Instamojo for WooCommerce ( India Only)
Premium Plugins
The free plugins will create your eCommerce store, add SEO, Security, spam protection, Backup and Restore and Payment gateway features to your eCommerce website.
But if you want to take your eCommerce store to the next level, you can use the Premium plugins.
Elementor Pro enables you to customize the entire website easily with its built-in premium features like sliders, woocommerce product pages, and others.

UpDraftPlus Pro allows you to take automatic backup in remote storage and add incremental backups on top of it.
WPForms Pro allows you to create user friendly contact pages using drag and drop feature and also accept payment using its forms. It allows you to add features like radio box, checkbox, multi select boxes, upload images and many.
WPmail Pro enables your woocommerce plugin to send email alerts to your customers on purchasing the products.
MonsterInsights Pro allows you to combine and integrate google analytics to your WordPress and it also features a user-friendly analytics dashboard that integrates into your WordPress admin so that you don’t need to keep visiting the Google Analytics website.

8. Setting up WordPress Security
If you are selling anything online and your website is connected to any kind of money related then the security of the website is crucial. To enable good security you can use premium plugins but you can also achieve the same using free plugins.
Yes you may not have the premium features, but having free security is better than having no security.
So you need to activate WordFence and Sucuri. These 2 plugins secure your website and make it harder for the hackers and spammers to attack your website.
Configure the Wordfence security and click the save changes. If you want to secure your website with Wordfence, we have a detailed tutorial on How to Secure your WordPress website from Hackers using Wordfence.
Next you need to use Sucuri and configure it. Sucuri allows you to harden the wordpress security and keep monitor on the file changes and login to your website.
You can learn more about sucuri on Best Steps to Harden Your WordPress Website Security from Hackers
These 2 plugins will protect you from all small and medium hacks and exploits, however you should always keep your plugins and themes upto date for security measure and subscribe to our WordPress Security Guide, so that you get alert when we release any security tutorials and newsletter.
9. Setting up eCommerce SEO
SEO is very important for ecommerce websites. To make proper use of SEO on a woocommerce website, we will be using the power of RankMath.
RankMath is a SEO plugin and is completely free to use and provides great premium features for FREE.

We have an in depth guide on how to use Rank Math for WooCommerce. Rank Math allows you to Optimize your homepage, your shop page and each products so that your woocommerce store starts skyrocketing from the 1st day onwards.
You can learn more about SEO for WordPress and WooCommerce on our WordPress Guides Page.
[convertkit]
10. Setting up The E-Commerce Plugin
In this part we are going to set up our WooCommerce plugin. WooCommerce has a total of 8 Sections to configure which we have covered on The Complete Guide on How To Setup Woocommerce.
The 8 Sections are as follows:-
- General
- Products
- Shipping
- Payments
- Accounts & Privacy
- Emails
- Integrations
- Advanced
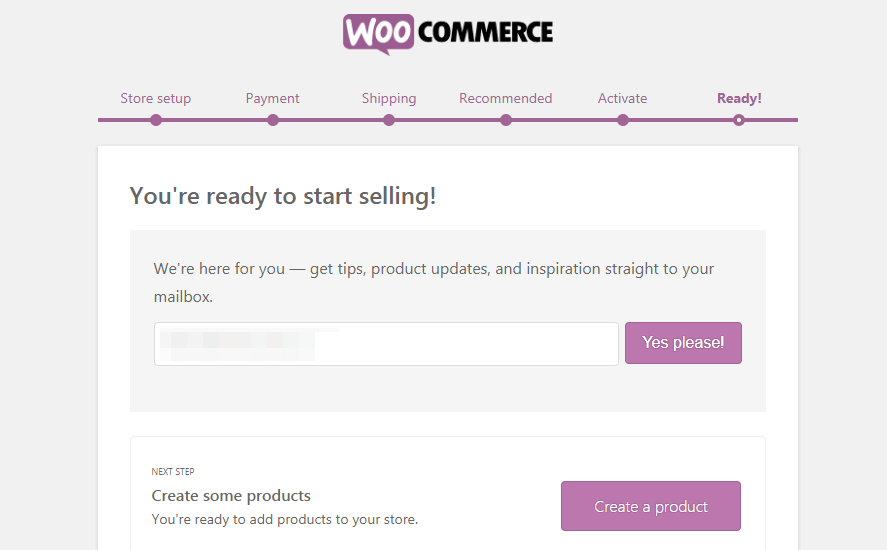
When you install and activate the woocommerce for the 1st time. Woocommerce will allow you to configure the settings with its setup wizard.
Click on Continue.( or Yes Please ). Next you will be asked to connect a jetpack that enables you the following features.
- Security
- Sales Tax
- Speed
- Mobile App
- Print your own shipping labels
- Simple Payment Setup
Since we cover all those settings on our own, we will choose to skip the jetpack features for now.
So click on “continue without jetpack and woocommerce services” and select continue.
Next you will have the address field., Fill in your store address and choose your store category, if your category is not shown here then select others. After that you will have to select the type of product you will sell.
- Physical Products – That you can touch and need to ship to the customers
- Downloads – Like Ebook, which you can send via email or allow to download
So we will select Physical products and click on continue. Next select how many products you want to sell and are you selling anywhere else. We will select 101-1000 options and No for Currently selling anywhere.
Next turn on the facebook and Mailchimp option and click on continue.
It will ask for a theme for your woocommerce store. Select the 1st option where it says Continue with my active theme.
The basic settings of the plugin are done. Now we will proceed installing the payment gateways.
11. Installing a Payment Gateway
Payment gateways allow you to charge your customers for the products they want to buy. Without payment gateways an eCommerce has no use and no meaning.
Payment gateways depend on your country and your customers. Since I’m from India and most of my customers are from India, USA, UK and Canada.
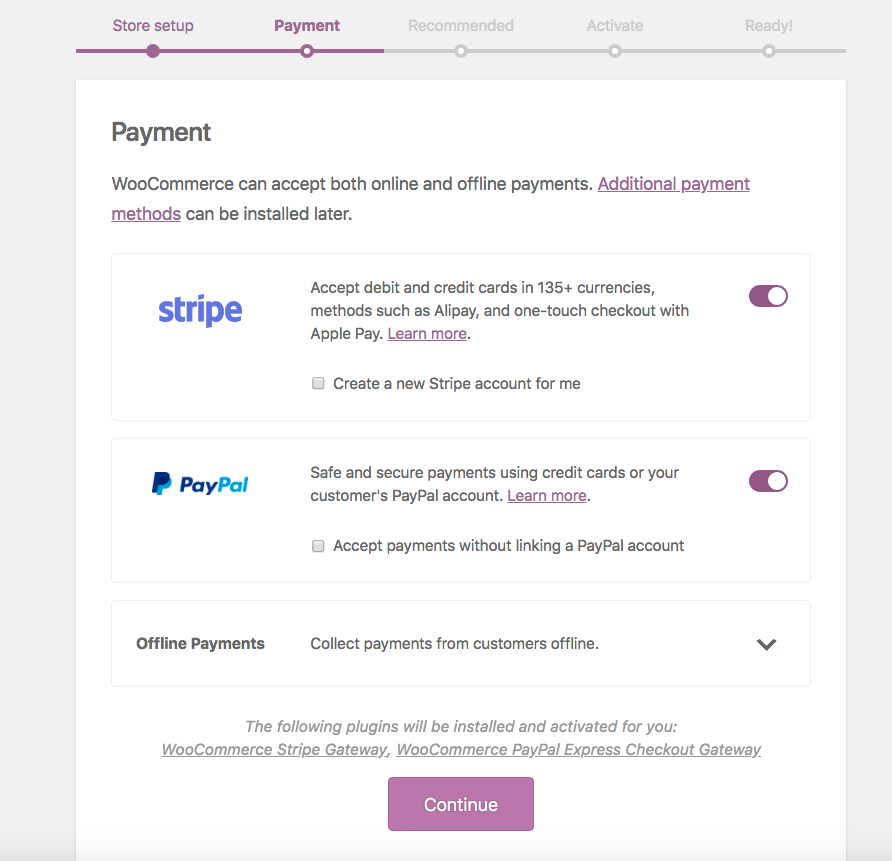
I will select the payment gateways for 2 countries
- PayPal (Global)
- Stripe (Global)
- RazorPay (India)
- Instamojo (India)
All these plugins are free to use and can be installed from wp-admin > plugins > add new > search. Activate the plugins and we will configure each payment gateways separately.
12. Shipping Setup
If you are selling any items to your customers then you are required to collect tax and pay to your government.
Inorder to collect the tax you need to set it up accordingly.
To set up the tax click on WooCommerce > Settings > General and Enable Taxes > save changes.
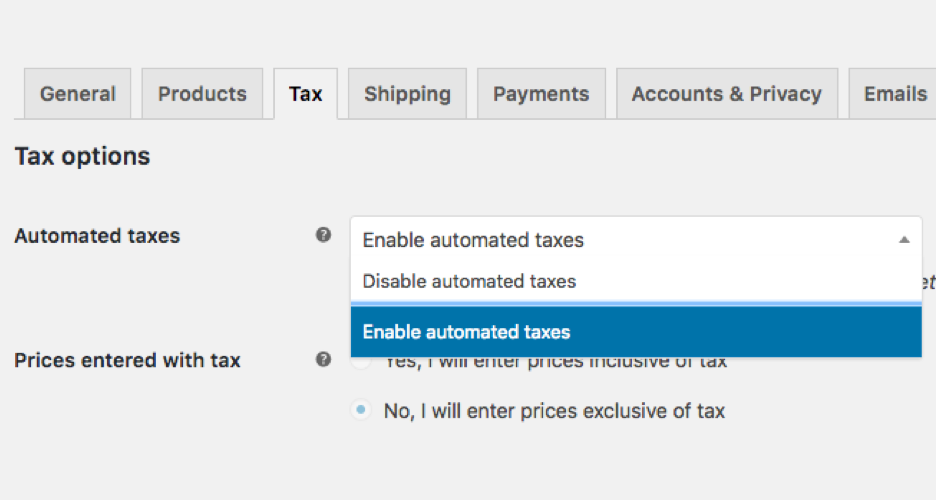
Now you will get a new tab, known as TAX. Click on it.
Configure your tax or you can follow our Complete Guide on How To Setup Taxes in WooCommerce.
13. Paypal Payment Integration
Go to Plugins > Add New > Search > Paypal woocommerce. Install and Activate the Plugin. Once activated go to wp-admin > woocommerce > settings > payments and select PayPal checkout and click on Manage button.
Choose your environment as live and paste your API credentials from PayPal.com. The Credentials that you need it
- Live API username
- Live API Password
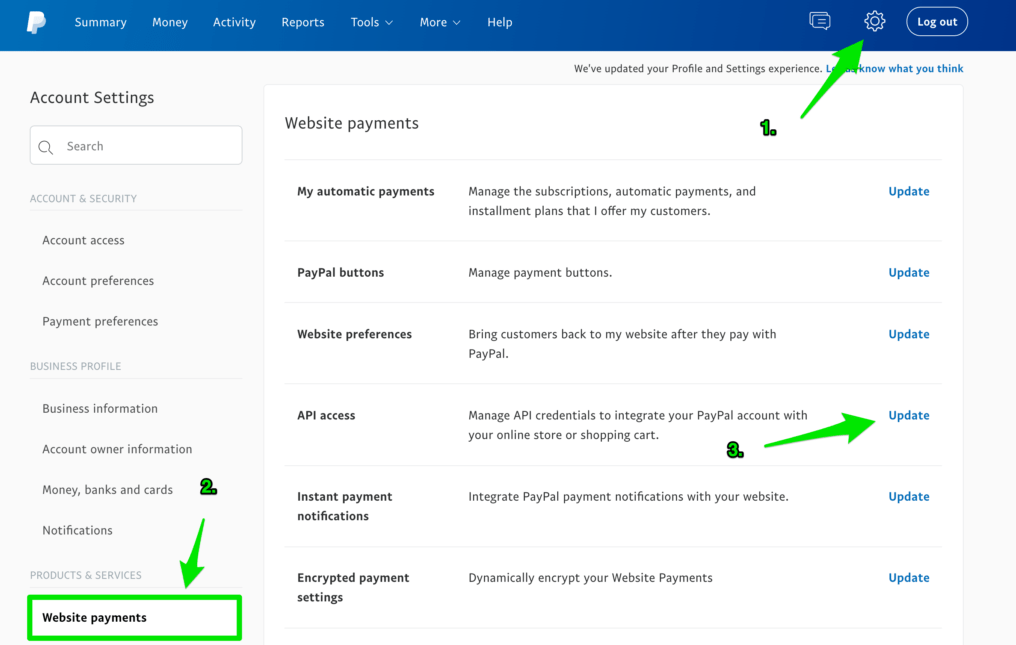
To get you paypal credentials,
- Go to https://www.paypal.com/us/webapps/mpp/merchant,
- Click on the Profile icon and then Profile & Settings
- Select My Selling Tools on the left side of the page then scroll down to API Access and click Update to view credentials.
- Select Option 2 to Request API signature
- Use API signature, not API certificate credentials.
- Copy your API Username, Password and Signature to paste into your WooCommerce PayPal Checkout settings.
That’s it. Your PayPal settings are complete and you are ready to accept payment using paypal.com
14. Stripe Payment Integration
Setting up a stripe payment gateway is really easy and simple.
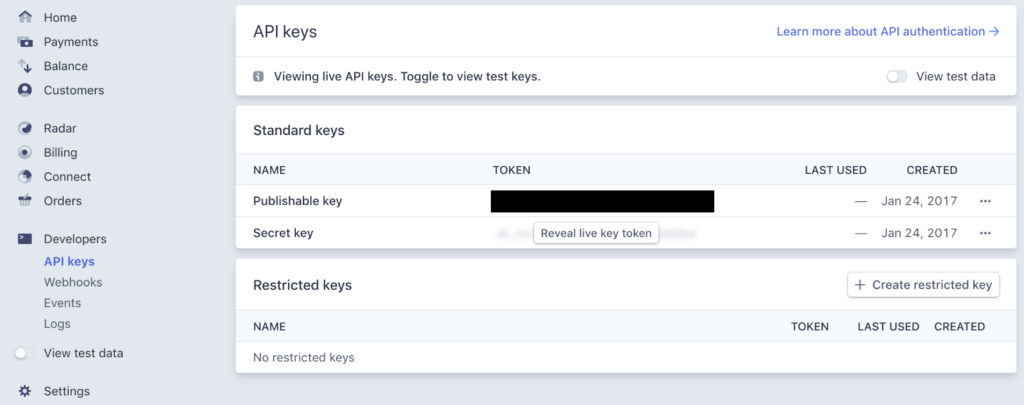
- Download and Install the Stripe for WooCommerce plugin from the WordPress repository. Since we have already downloaded and Activated the Stripe Payment gateway for woocommerce. Now we need to configure it.
- Go to WooCommerce > Settings > Payments and Click on Stripe (Main)
- Check the CAPTURE box
- Enable Stripe Checkout
- Enable Payment Request API
- And lastly paste the LIVE Publishable Key and LIVE Secret Key
And click on save changes. To use Stripe, SSL must be enabled.
15. Razorpay Payment Integration
Setting Razorpay is the easiest among all the Payment gateways. Once you have Installed and activated the Razorpay plugin. You just need to follow a few steps to enable it.
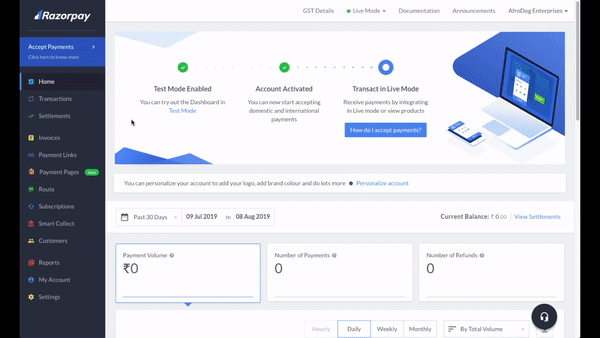
- Go to WooCommerce > Settings > Payments > RazorPay > Manage
- Paste Your KEY ID and KEY SECRET, which you can obtain from razorpay.com. Login to your Razorpay dashboard and find the API key ID under settings.
- Click on Save Changes
Razorpay is now enabled and can now process customers checkout.
16. Creating our First Product
To create our first product we need to have the product images and their details on hand so that we can start adding the details in woocommerce to fasten the process.
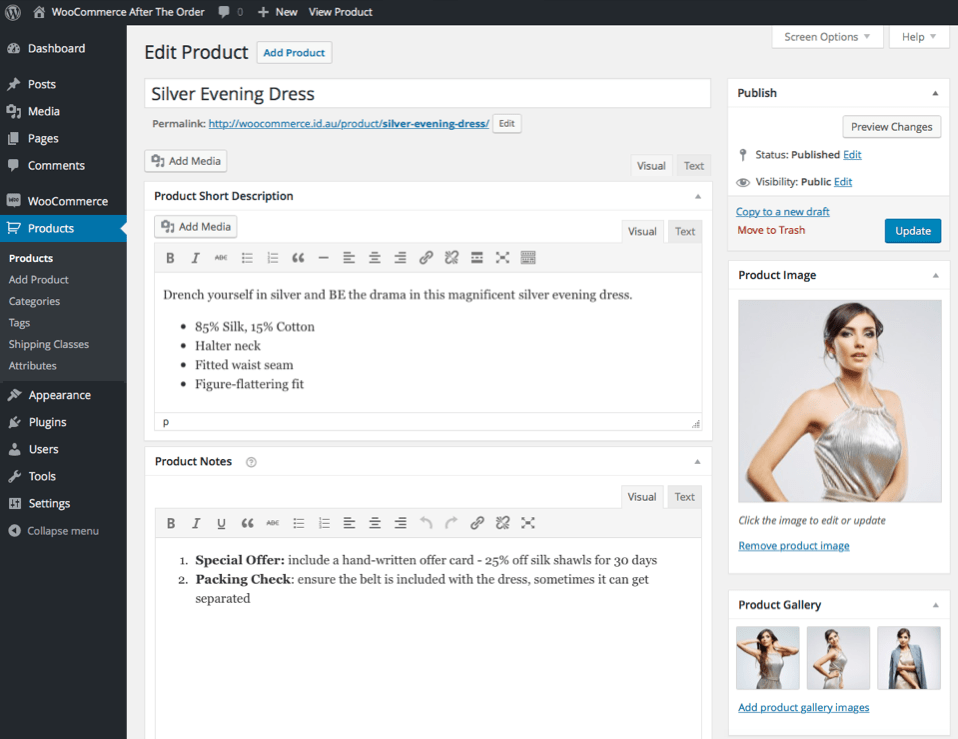
Lets add a T-Shirt to our WooCommerce Store.
- Go To wp-admin > Products > Add New
- Enter the name. And description of the product
- Add the Product Category
- Now We need to add Pricing and other valuable information in Product Data field
- Go to product data and select Simple Product
- Product Data > General > Add the normal price and Sale price, tax status and tax class.
- Next go to inventory > Add SKU (Product Serial Number) and click on Manage stock and the stock quantity.
- Next click on shipping and put the weight and dimensions.
- Finally add Product Main Image and Gallery Images.
- Click on Publish. Your Product is LIVE.
17. Understanding Different Types of Product
While Adding Product in WooCommerce, you will get 4 options under Product Data.
They are
- Simple Product – A simple product like iPhone Charger.
- Grouped Product – Like iphone charger + iphone earbuds ( 2 or more products )
- External / Affiliate Product – on clicking this button, you will be redirected to another website. Mostly used for Affiliate products.
- Variable Products – Products that have different variations. Like Sizes, colours etc.
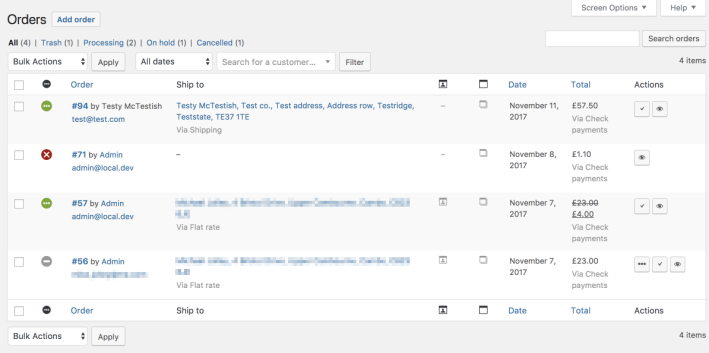
18. Managing Orders
If you get any order in WooCommerce, then you can check and manage its complete details in WooCommerce > Orders.
You will get complete details of the order.
- Name and Address of the person
- Method of Payment
- Payment status
- Payment amount
- Items which is ordered
- Number of items ordered
- And the shipping address.
WooCommerce order status are mainly.
- Pending payment — Order received, no payment initiated. Awaiting payment (unpaid).
- Failed — Payment failed or was declined (unpaid)
- Processing — Payment received (paid) and stock has been reduced; order is awaiting fulfillment.
- Completed — Order fulfilled and complete – requires no further action.
- On hold — Awaiting payment – stock is reduced, but you need to confirm payment.
- Canceled — Canceled by an admin or the customer – stock is increased, no further action required.
- Refunded — Refunded by an admin – no further action required.
- Authentication required — Awaiting action by the customer to authenticate the transaction.
19. Fulfilling and Processing Orders
To fulfil and manage the order you need to select and open the order from WooCommerce > Orders.
If you have received the payment then the order status will be Processing. Print the Customers shipping address and put it to the product. Pack and ship the product.
If you have shipped the products to the customers, then select the order status and update it to completed. When updating completed, also provide shipping details so that the customer can view their order status.
This is how you fulfil the order and process it.
Conclusion
Creating an eCommerce with WordPress by following this step-by-step guide is really easy and simple. WooCommerce is a wonderful plugin that we and several others uses for their e-commerce store.
If you need any professional help for setting up your ecommerce than you can contact GloriousThemes.com , their experts will setup your eCommerce store in no time and you don’t need to hastle for anything.
If you have any queries related to this article, then comment below and I will reply to your every question.
very interesting , good job and thanks for sharing such a good information