How to Start a Blog on Siteground and Make Money – The Complete Guide
Several of our readers have asked us How to Start a Blog on siteground and is there any chance of making a living using a blog. And is blog life better than a job.
Well, Yes you can become a blogger and make a great living and it’s always good to have some extra money if you can earn from your blog.
There several ways to monetize a blog like an affiliate marketing, advertisement, sponsored content, membership, and several other ways. We have made a collection of Best Personal and Niche Blogs that makes Online money.
Note: Check our Complete Guide on SiteGround with Video Tutorials.
The best thing about the blog life is that it provides complete freedom and the opportunity to work from different places as all you need is a laptop and internet connection.
People have built communities just by creating a small blog, who started solving small problems and now that small blog has grown to a much larger community that provides more than 7 figures income to them. And one of them is Pat Flynn from smart passive income.
Starting your own blog needs some technical knowledge, But in this guide will show you how we can start a blog, get the right hosting and get started with your blogging career in less than 20 minutes and all of this doesn’t need any knowledge for coding.
So in this tutorial, we will teach you how to start a blog on siteground and make your first $1000 income from it.
Get up to 70% off on siteground web hosting plans.
In case if you are thinking that you are not a techie and you need to hire someone to start your own blog and pay them thousands of Dollars then and this article will definitely Save you $2,000
Disclosure: I may receive affiliate compensation for some of the links below at no cost to you if you decide to purchase a paid plan. You can read our affiliate disclosure in our privacy policy.
How to Start a WordPress Blog on Siteground
To make it easier for you, we have divided this tutorial into several categories
- Difference between a blog and a website.
- Finding your blogging niche.
- What you need to start a blog.
- Why choose siteground.
- How to start your blog on siteground in 6 easy steps.
What is the Difference Between a Blog and a Website?
There is not much difference between a blog and a website. The only thing that separates a website and a blog is its homepage and information on it.
If a website shows only the blog post and its home page contains the most latest post then that website is a blog.
But if a website welcomes you on their homepage with information about what the website is for and contains several other sections like about, sections and has a separate link for its blog and provides several other information then that is a website. For example, you can check the website gloriousthemes.com

Most of the business websites nowadays have a blog and that provides a great advantage for their website to bring new visitors from search engine results.
Finding Your Blogging Niche
Starting a blog is really easy and hardly requires any time and effort in getting started and if you follow our guide you can do it in a much easy way and without making any mistake on the way.
But the challenge comes on searching the perfect niche. To get your perfect Niche, you can Filter it using your skills, interest, expertise. Niche is actually a sub-topic of a broad subject. They provide specific answers to a particular category.
Searching a perfect niche for you is a part of Keyword Research and Analysis. Once you found the perfect niche that suits your interest and you have the knowledge and your expertise, you can start creating your blog on siteground.
What you Need to Start A Blog
To start a blog like a professional, you need the following things.
- Domain name: The domain name is the URL address for your blog where the visitor can find you. A domain name is the internet address for your blog just like you have a physical address for your home.
- WordPress – WordPress is the best content management system (CMS) right now on the Internet and it’s free and the best thing is that it gets regular updates which makes it really safe and secure and easy to use with all the latest technology in built-in it.
- WordPress Theme – A theme is the outer look of your WordPress blog that’s what your visitors see. A theme provides the experience that you want and lets your visitors realize that it’s a professional blog and not started by a newbie that knows nothing about the topic.
- Web Hosting – The place where you will combine all the three elements that we mentioned above to create your blog. Web hosting is the place where you are going to host all your content like the software that you are using ( i.e WordPress), the domain where it is going to point. Without web hosting, you cannot build a blog.
Why Choose Siteground as Your Hosting.
There are so many options for choosing a web internet and you will find the most of them are really cheap and promises you a lot of things.
For example Godaddy, Hostgator and several others.

I personally don’t recommend them using it since I have used them and I found a lot of problems with them and the support was really terrible. And during peak hours when your website will get good traffic the website in Seems to crash on their servers.
For this reason, I will recommend you to use Bluehost or Siteground. Siteground is really great for WordPress since its service is designed specifically for WordPress and to provide speed and reliability.
I use both Bluehost or Siteground, since they are right now the leading web hosting platform for WordPress.
How to Start a Blog on Siteground in 6 Easy Steps
If you are really interested in starting a blog and you are serious about it.

I would recommend you to follow this guide step by step as it is mentioned here and you will start your blog in no time and if you get any kind of trouble just hit the contact us button and I will make sure your problem gets solved easily without paying any penny.
To get started creating your blog, click this link that will open the siteground on a new tab and a coupon for 70% discount will be automatically applied.
Keep your credit card or your online banking or Paypal ready for that you can make the transaction and get started with a new web hosting and install your wordpress in no time.
So let’s get started.
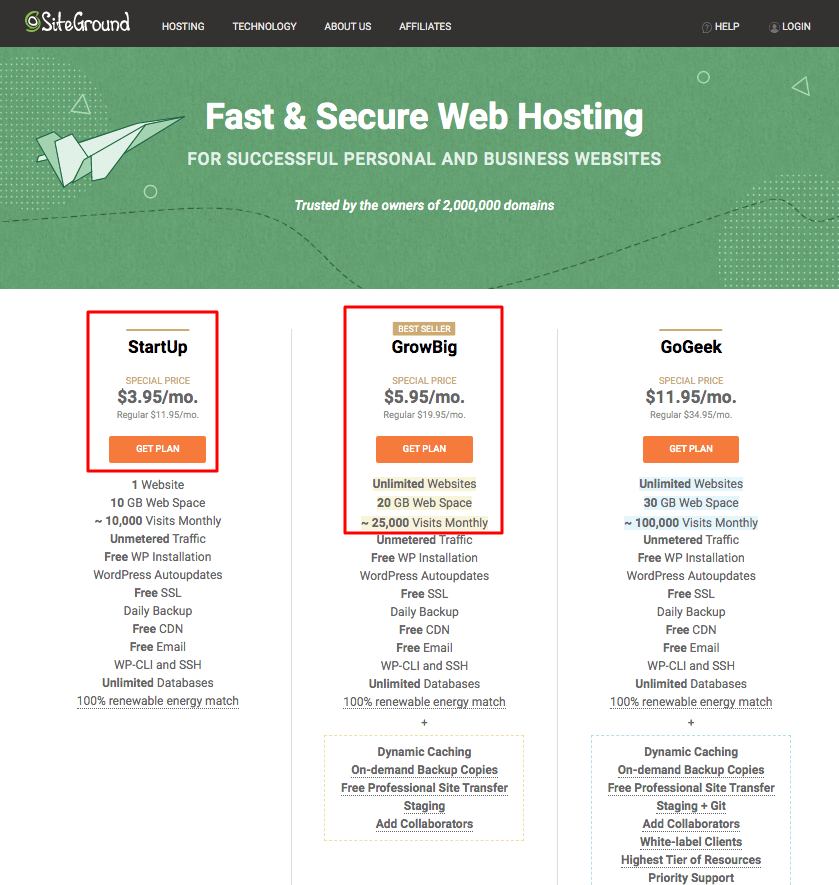
Visit the SiteGrounds website using our special link to get a 70% discount and navigate to their hosting plans. Siteground provides 3 different kinds of hosting plans.
- Startup
- Grow Big
- GoGeek
If you are just starting a blog I would suggest you go with the most basic and cost-effective plan that is “startup“.
But keep in mind that the startup plans only allow you to host only one WordPress website. If you are planning to host more than one website, choose Grow Big.
Since I have more than one website I have to choose the GoGeek option and I really love it. So here we have compared the different plans offered by the siteground.
StartUp Plan
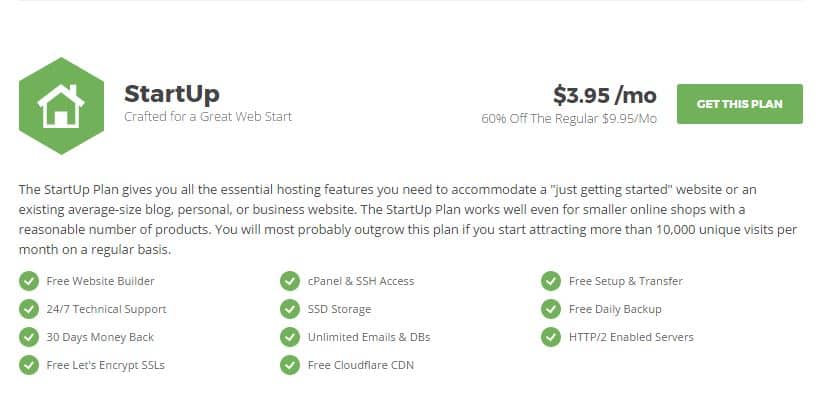
This plan is really suitable for those who are getting started and will only manage 1 blog. If you are completely a new beginner then we recommend you use StartUp plan as it’s really cheap and provides you almost everything that you need to get started for your blog. StartUp Plan cost you only $3.95 per month.
This plan provides you the following
- 1 WordPress website
- 10000 Monthly visitors
- 10gb WebSpace
The GrowBig Plan
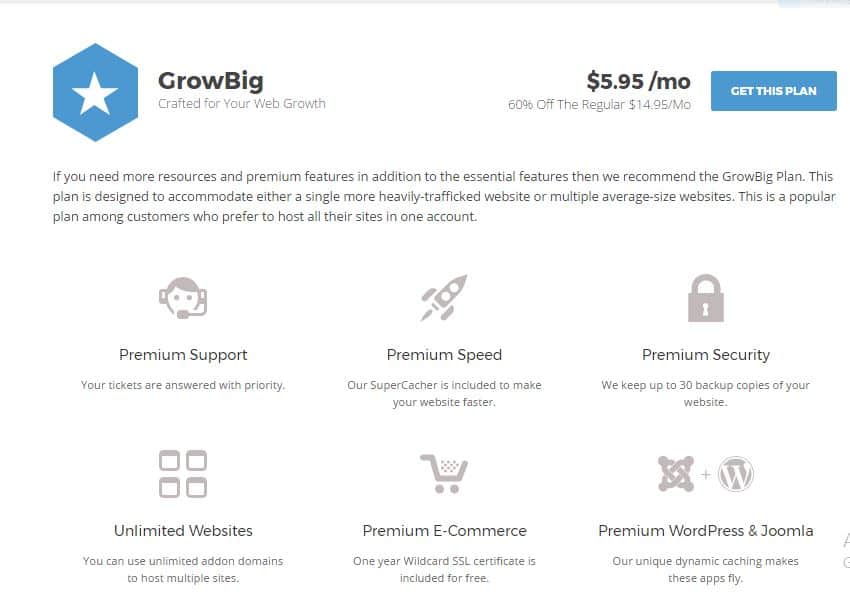
This is the best value for money plan and provides almost all the features that someone who is growing and operates multiple website can have.
The plane starts from $5.95 /month and provide the following features
- Multiple Websites Hosting
- 20 GB web space
- 20,000 monthly visitors
- and super Catcher by siteground
The GoGeek Plan
Well, this plan is not suitable for all, especially for those who are starting right now. If your website grows quickly, you will always have the option to upgrade your account with just click of a button.
This plan is suitable for those who gets thousands and thousands of traffic per month and runs a big website or eCommerce site.
Step to Choosing your Domain Name
So once you choose your right plan the next step is to choose the domain name for your website/blog. It’s important to pick a perfect name for your blog and for this you can watch our tutorial on How to Select the Perfect Name for your Blog.
Once you are satisfied with the Domain name and if you have use our method then obviously you will get the best name for your blog. Here are a few important tips to consider while choosing your blog name
- Choose a name which is easy to spell
- Make it short
- Make it rememberable
- Try choosing keywords
- Avoid any number-symbols or hyphens
- Always use .com for your blog
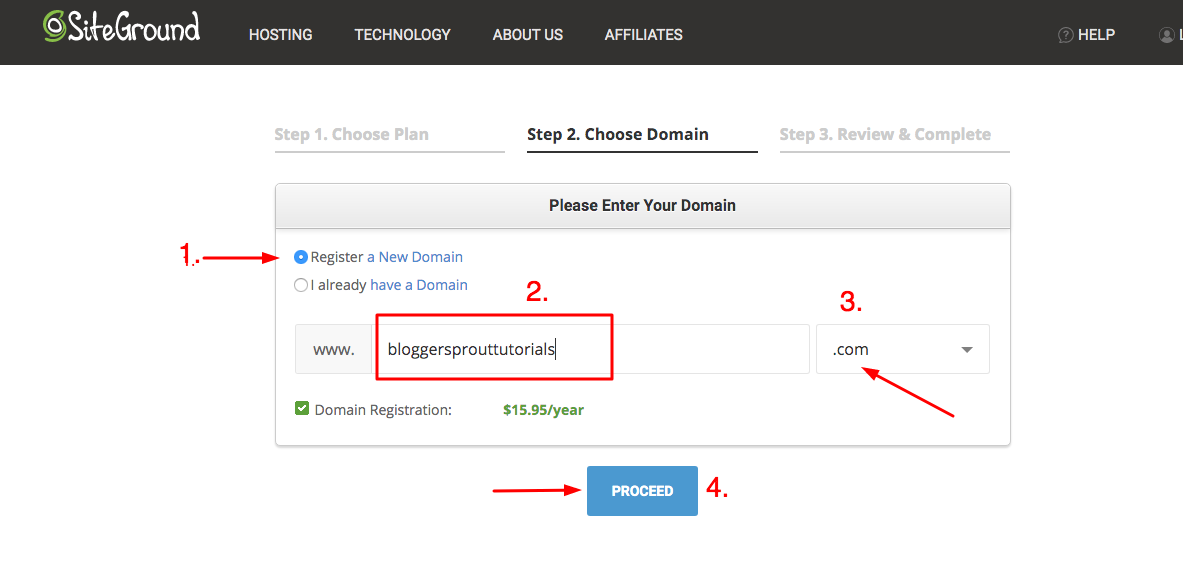
If you already have a registered domain then you can skip this step by clicking on” I already have a domain” and press the Proceed button.
If you don’t have a domain you can create one with the siteground. Just click on the “Register a New Domain” option and type your domain name. If the domain name is available, the siteground will allow you to register it.
Click on Proceed Button.
If the domain name that you have chosen is available for the registration then siteground will then take you to Step 3.
Step 3: Review and Complete the Payment Process on SiteGround.
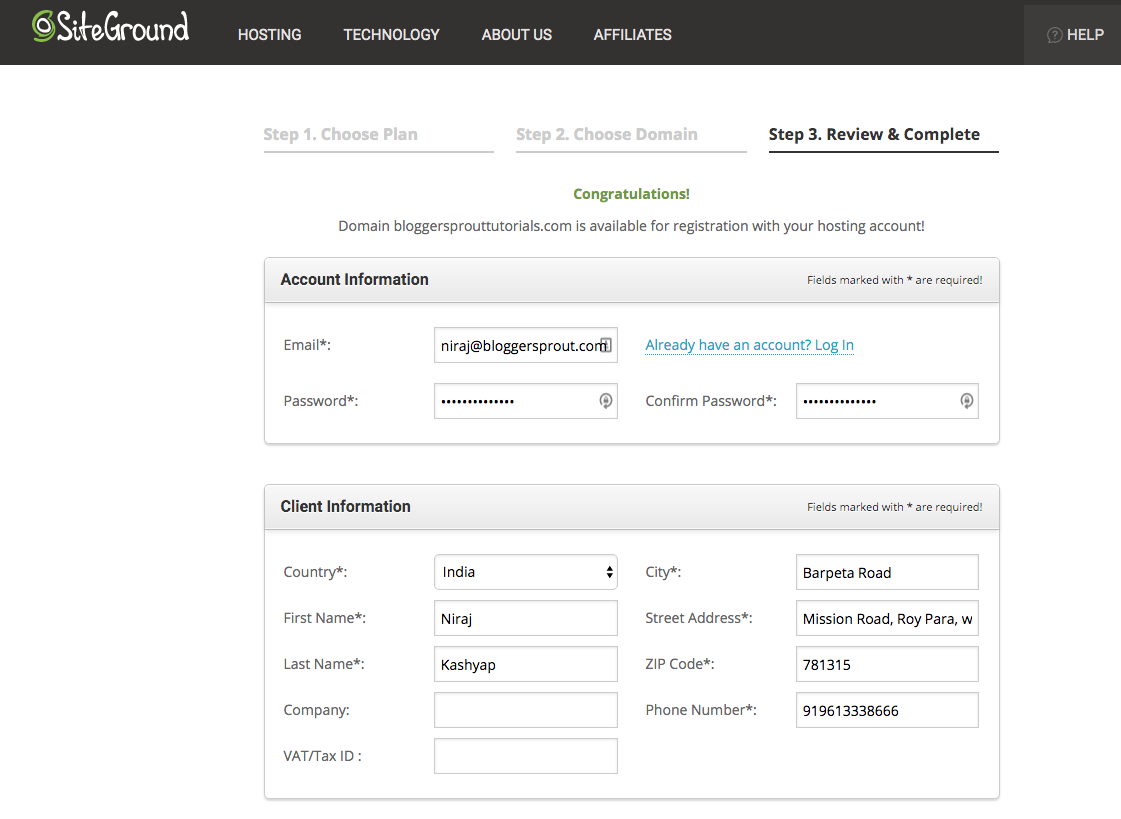
This is the final step of creating your account. Fill in the required information. This page is is divided into four sections:
- Account information
- Client information
- Payment information
- Purchase information
Account Information
In this section, you need to fill your email id and the password for your account so that you can use it to log in.
Client Information
In this section, we need to fill your basic details like your country, city, your address, phone number and your company’s name.
Payment Information
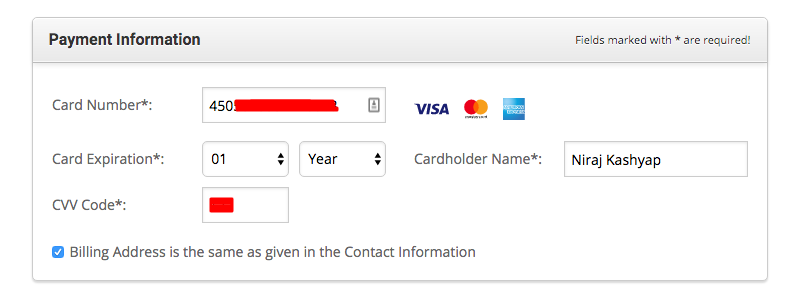
This section allows you to add your credit card details that can be used for Purchasing your hosting plan using a secure checkout feature on the siteground.
Purchase Information
This is the final step of completing your purchase and getting your web hosting on siteground. Before proceeding there are few things that we need to change and check whether the details are correct.
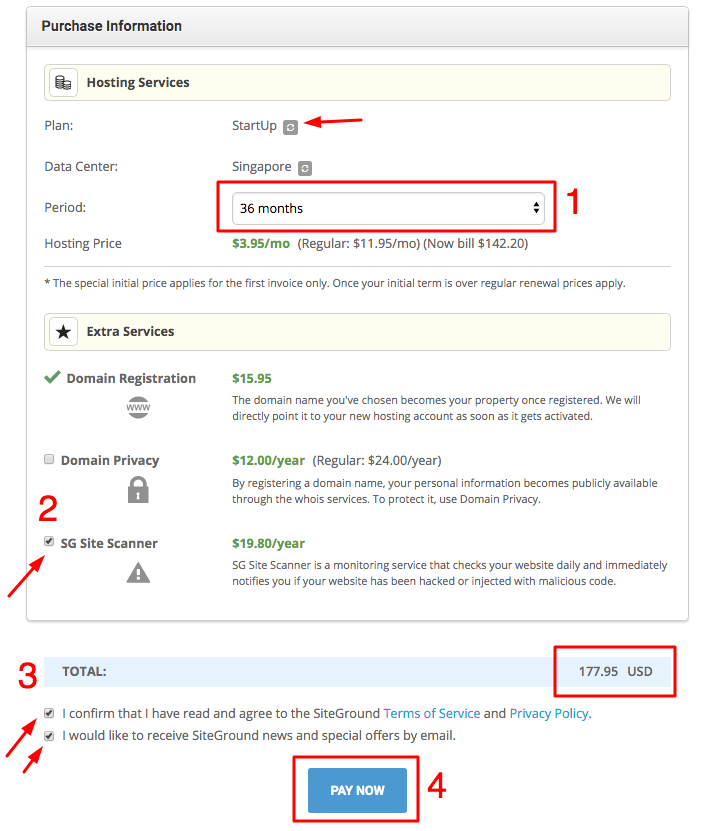
Plan: Check the plan is the one that you have used ( startup for grow big)
Data Center: Choose the nearest data center that is available to your country. Since I am from India, for me the data center in Singapore. Which is the nearest data center for India.
Period: Choose the period that you want to purchase your hosting plan. I would recommend you to use 36 months( 3 years) since you will get enough time to focus on blogging and stop worrying about renewing your hosting plan. As the renewal fees are the normal increased fee.
The longer the period you choose, the cheaper and the better service you get. Let me explain to you how.
All hosting companies provide a great discount for new customers as you can see in this picture the start of plan cost you around $3.95 month, but the regular price is 11.95.
So, if you choose to register your hosting plan for one year that is 12 months, as soon as your hosting account will near to its and the renewal charges will be $11.95 month.
Which is about 4x times the price of current offer that you are getting. So it is smarter to register for 3 years( 36 months) and save the renewal fee price for 2 years.
The Calculation
The renewal fee for 2 years would be
$11.95 * 24/months = $286.8
+
$3.95 * 12/months = $47.4
Total Cost: $286.8 + $47.4 = $334.2
Whereas you are going to pay just $3.95 * 36 = $142.2 for 3 years.
Total Savings: $334.2 – $142.2 = $192 ( WOW)
Extra Services
SG Site Scanner: I recommend you to use the SG Site Scanner which costs around $20 for a year. The SG Site Scanner is a monitoring tool that scans your website daily and alerts you if your website has been hacked or infected with malicious code.
This is a serious issue for WordPress users and Bloggers.
If your website contains malicious code, Google will just block your website and delist it and will prevent your website from appearing in the search result. Not just that if your website is hacked all your hard works can be deleted or stolen within a few seconds.
We have written a detailed guide on the Bluehost account Deactivated due to Malware.
And once your website is hacked you need to purchase a service for near about $210 to get rid of the hack and malware, So it’s better to invest $20 Now instead of $210 + the risk in the future.
Once you feel all the required information and you are happy to proceed. Click on Pay Now.

The siteground will take you to a secure checkout page and will verify your payment details. If your payment details are correct, siteground will send you an email with the success message that your account has been created.
Check your email id and you will see e email from siteground – “ Get started with siteground ”. Open that email and you will find the login URL and your username.
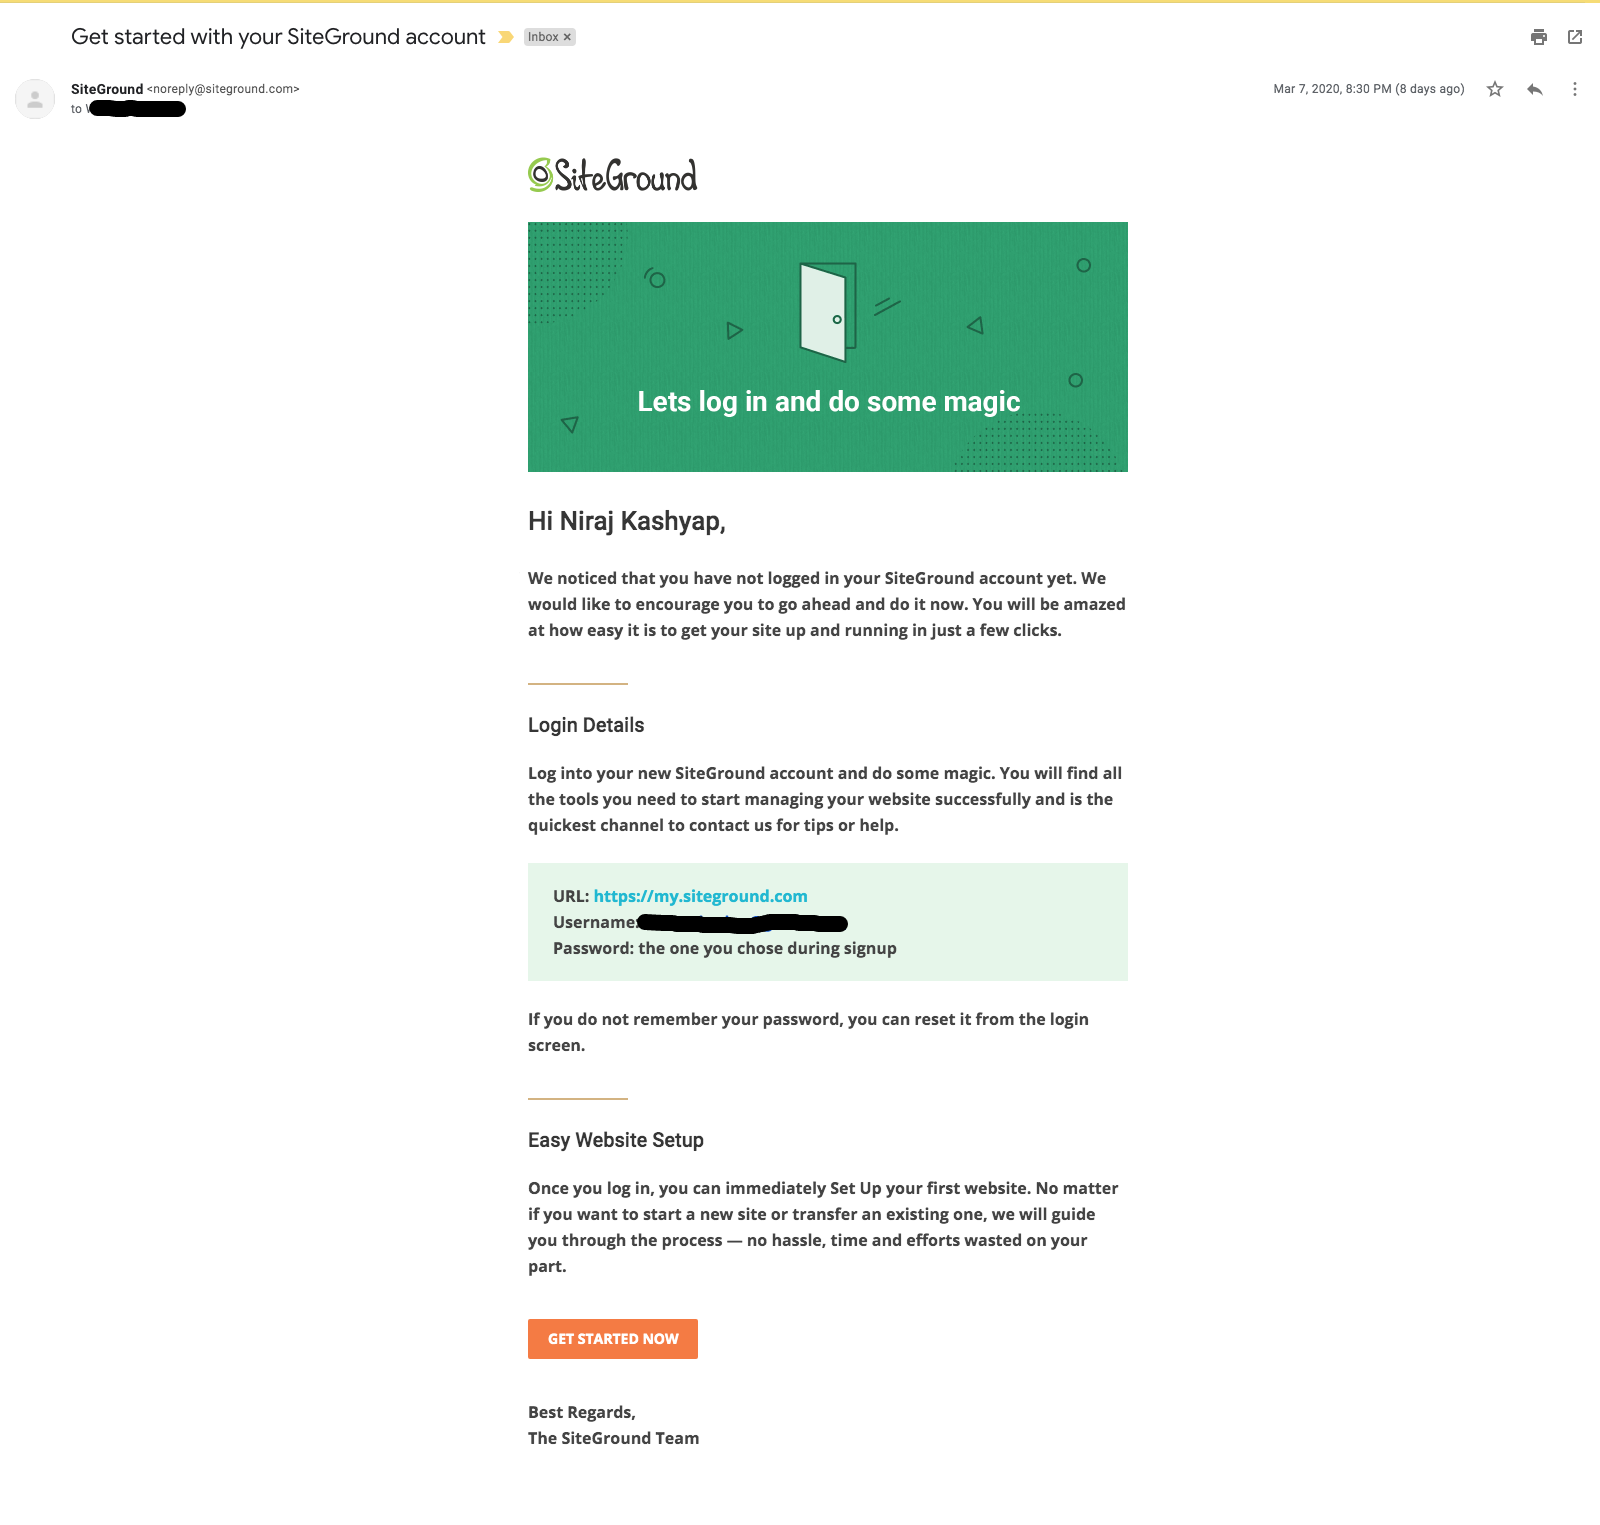
Click the link ok and you will be redirected to the siteground’s my account page. Paste the username and the password that you have choosen during signup and click on login.
That’s it your account has been created, and now you have logged in to your hosting account.
If you have faced any issue during this check out you can contact us or the siteground team and they will definitely help you.
How to Install WordPress on Siteground
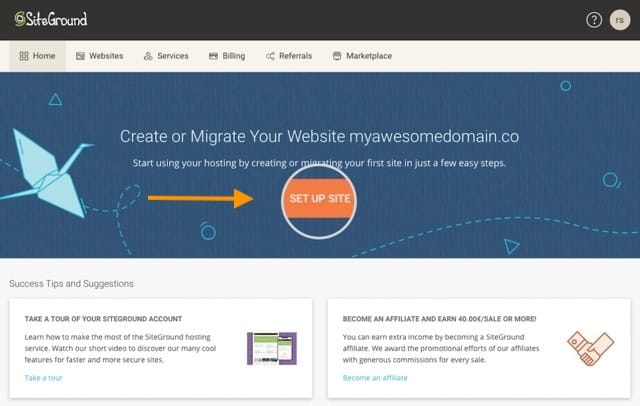
Now that you have already created your account on siteground, it’s very simple to start your blog with WordPress on siteground.
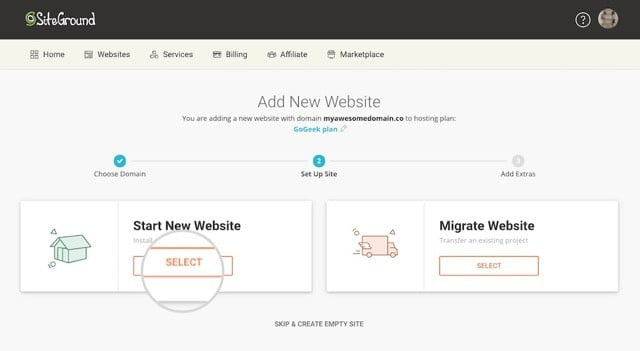
When you login for the first time on siteground, you will see a big button that says- setup site.
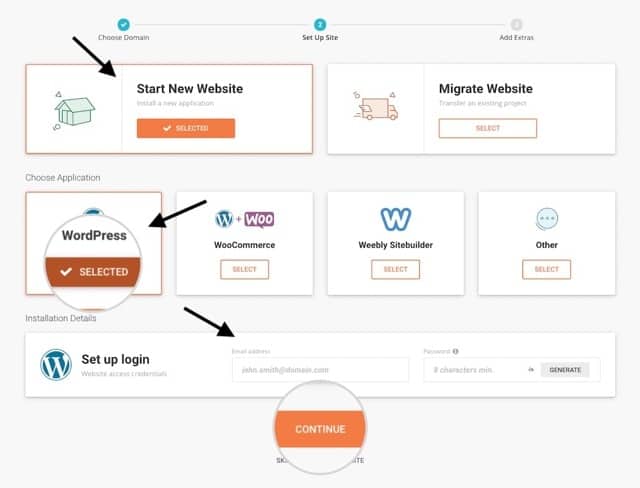
Click on it and select “Start New website“.
Next, select WordPress and click on continue.
On the next screen, you will get the option to choose the additional services. Skip it for now and move to the Final process.
Click on the finish button.
That’s it, you have successfully installed your WordPress site. Siteground will display the WordPress admin URL, username and password. Click on “login admin“. That’s done you have now successfully installed your WordPress site and you are ready to start your blogging career.
What Next after Installing WordPress
After you have successfully installed WordPress, there are a lot of things to take care of. You can do it all by yourself by following all the links and Guides that we have given below or you can hire the WordPress expert at a very cheap and reasonable price from gloriousthemes.com/services.
Some of the steps that you need to do after setting up a new WordPress.
- Essential settings to configure on a newly installed WordPress.
- What are the essential plugins to use on a new WordPress site?
- Which is the best theme for a new WordPress site?
- How to protect your WordPress blog from spam attacks.
- Best WordPress security plugins for a new blog.
- Best SEO settings for a new WordPress blog.
- How to earn your first 1000 dollars from your blog.
Conclusion
I hope it wasn’t too difficult to get started with your blog on siteground. If you haven’t started yet, click on the link get started with siteground, and get your domain hosting at 70% discount.
If you have already installed WordPress and wondering how to get started with your blog, follow the above-given links or contact us if you need any assistance.
The best web hosting for WordPress is Siteground and Bluehost. I personally recommend siteground for beginners as it is easy to handle and the reliability and speed are superb. Siteground also provides 24/7 support.
To learn more about blogging subscribe to our special community newsletter, scroll below and fill your email id to get started.
