How to Add Content Tabs To WordPress Posts and Pages
Do you have a long post or a long content on your website and you want to divide it into tabs to make it easier for your users and audiences to find what they are looking for?
Dividing your content into the different sections is really simple and easy with the use of tabs. Tabs allows you to create a different section for your content within your main area so that the user can easily switch to the content they want to read.
Tabs are widely used in an eCommerce website, as you can see in this picture below. But now tabs are making their way to more and more blogs and content websites.
Tabs increases your audience retention rate and decreases your Bounce rate as it keeps your user engaged with your content and prevent them from getting bored with the long content.
So in this tutorial, we will exactly so you how you can add a content tab to WordPress posts and pages either you are using a page builder like elementor or Guttenberg, or you want to edit a tag or remove it or create custom tabs in tabs in WordPress for posts and pages.
Disclosure: I may receive affiliate compensation for some of the links below at no cost to you if you decide to purchase a paid plan. You can read our affiliate disclosure in our privacy policy.
Adding the Tabs using Elementor
If you are using a page builder plugin, then you already have the functionality of a tab enabled in it. Most of the Page builder offers tabs prebuild in their drag and drop editor as a core part.
Here we will be using the elementor page builder. Also check out the 15+ Best WordPress Themes For Elementor.

To Add Content Tabs To WordPress Posts and Pages using the elementor Page builder. Open the Post or page where you want to add the tabs.
Click edit with Elementor > Search > Tabs. Drag and drop the tabs to the location where you want to add it.
Edit the tabs and change the default value to the value you want.
Once done, click on Update/Save Changes.
Adding the Tabs using Gutenburg
To add tabs in Gutenburg, you need the support of Gutenberg blocks. Gutenburg blocks allow you to add tabs and other features to the Gutenberg editor.
To add tabs in Gutenberg you need to download a free plugin from WordPress Plugins repository. Ultimate Blocks is a Gutenberg blocks Plugin created for bloggers and marketers
And allows you to create better contents with great visuals and functionality right from the Gutenberg editor.
Log in to WordPress Admin > Plugins > Add New > Search and type “Ultimate Blocks – Gutenberg Blocks Plugin”.
Install & Activate it.
After you have activated it, Go to any post or page you want to add the tabs. Click on the add “+” icon and search for tabs.
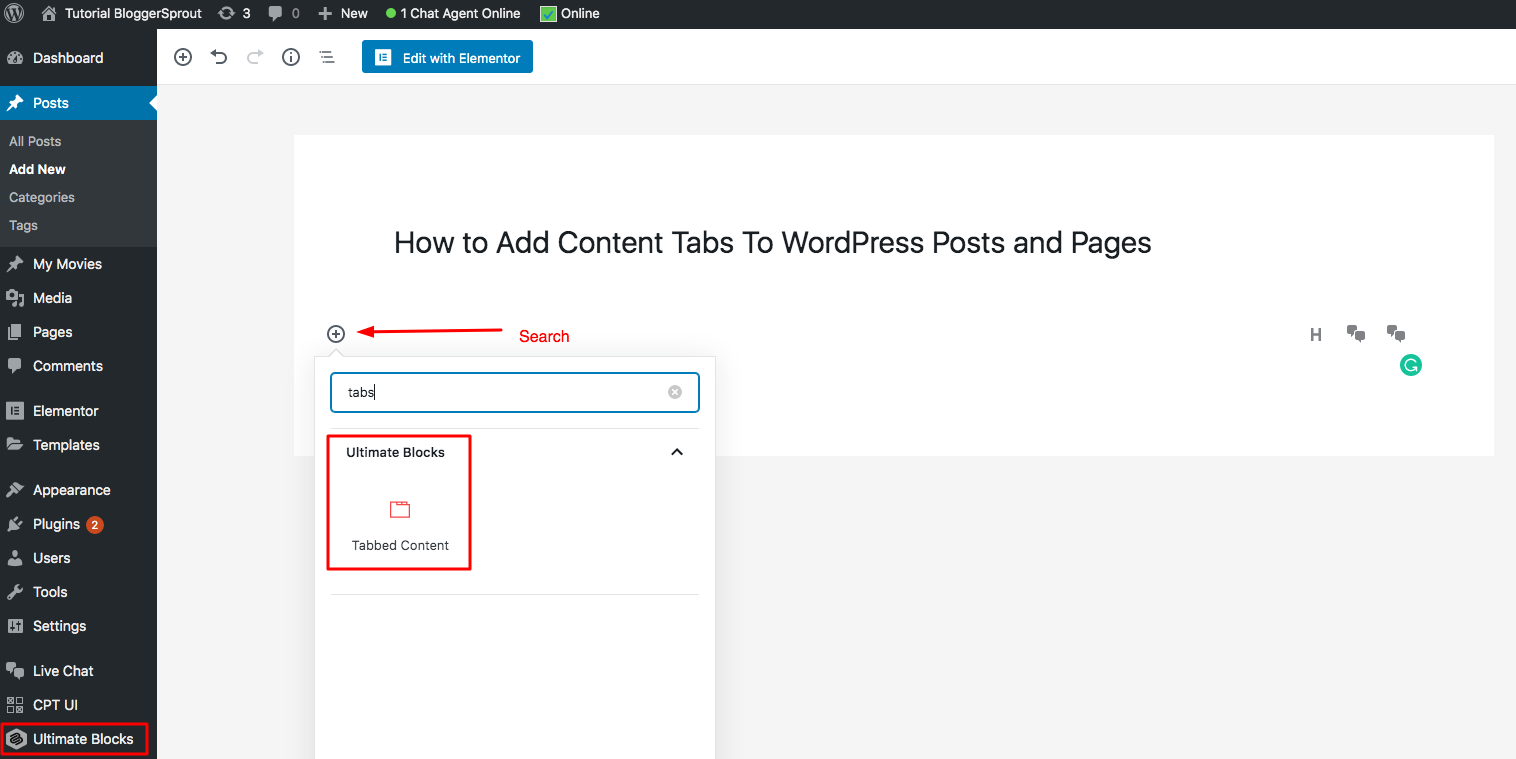
Select the tabs from Ultimate blocks.
The tabs would be added to your Gutenberg editor. Edit and make necessary changes as per your requirements.
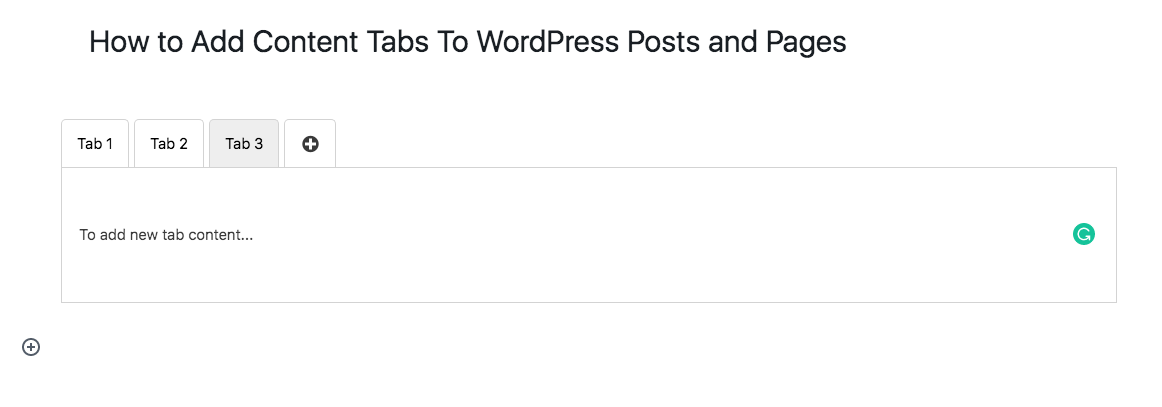
That’s it
You have learned to Add Content Tabs To WordPress Posts and Pages using Gutenburg.
Adding the Tabs using WordPress Plugin
To add a tab in WordPress you have to use some kind of Page builder or a theme with that function. There are plenty of great alternatives available as Paid and Free plugins.
The best way to add page builder is to use WordPress Drag and Drop Page Builder. But in this tutorial, we will use this “Tabs” plugin by wpShopMart. This plugin is free and is available in WordPress Repository.
Go to Plugins > Add new > Search > Tabs. Install and Activate it.
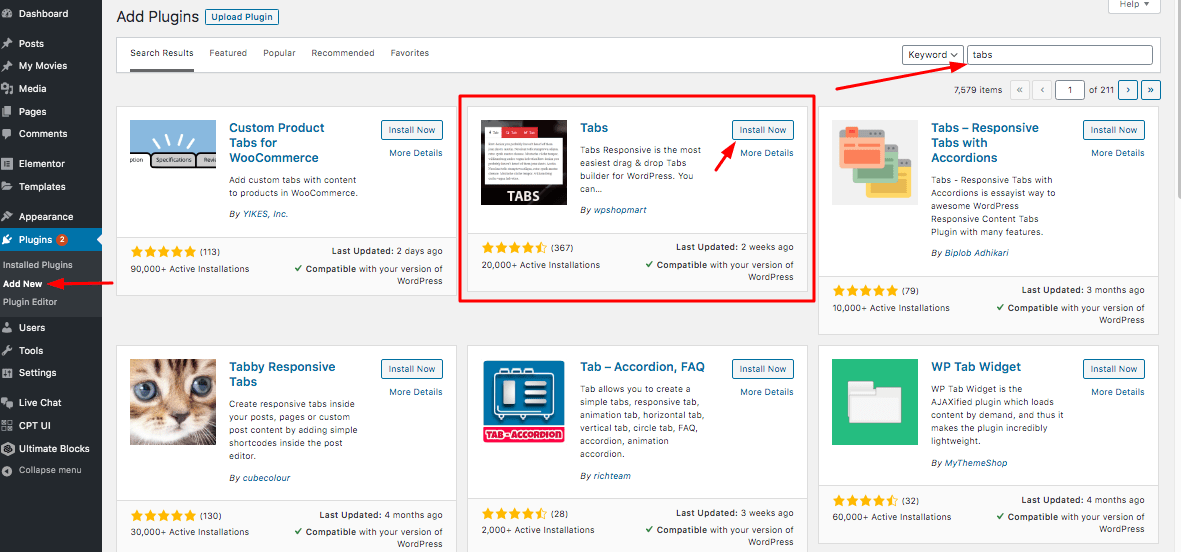
After you have activated it, you will see a new admin menu has been created – “Tab Responsive”. Go to Tabs Responsive > Add New Tabs.
Add The title of the tabs and then fill the details for each tabs. Each tabs provide the following details to be added, Title, Descriptions, Icon and icon position.
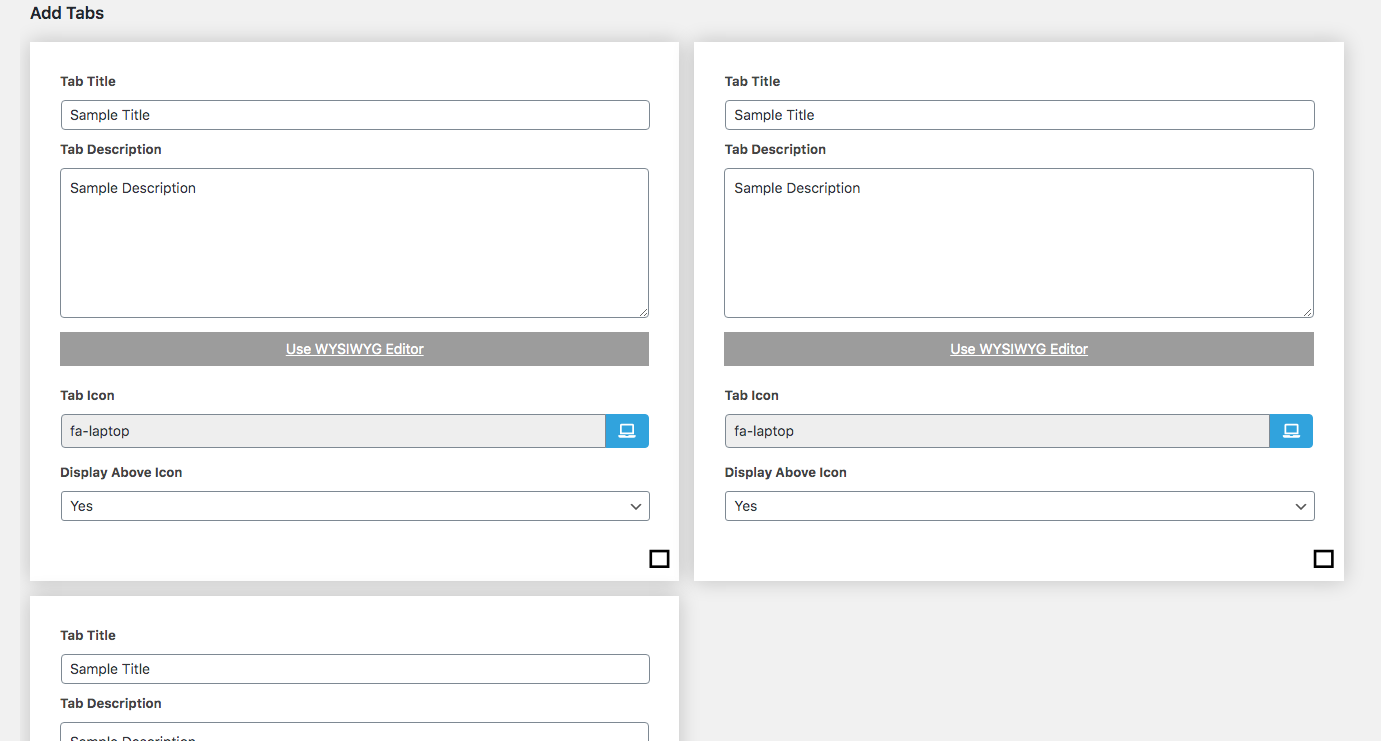
Now Lets Start Configuring Tabs
Configuring new tabs can be done in 5 steps and in 8 simple steps you can manage the tabs.
- Tab Title – Add your tab title in this field.
- Tab Description – Your tab content goes here.
- Use WYSIWYG – Tab description allows you to edit content in WYSIWIG ( What-You-See-Is-What-You-Get ) editor, this allows you to edit the content much faster and easier.
- Tab Icon – Tab icon allows you to assign your icons to each tab.
- Display Above Icon – This option allows you to configure the icon position for each tab. You can assign the tabs above or below the title of the tab.
- Delete – To delete a specific tab
- Add New Tabs – Click on this button to add more tabs
- Delete All – Delete All button allows you to erase every tab you created.
After you have filled all the required information on each place, your tabs are ready to rock, but if you want to change the design of any of tabs then go to the settings tab and configure the settings as per your requirements.
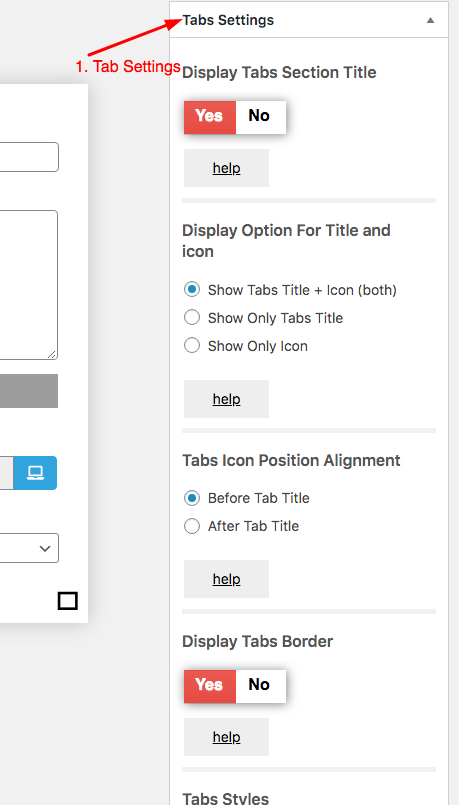
The settings field in the right side allows you to configure the following:
- Tabs background-color
- Tabs font color
- Font family and style
- Display options for all tab title and icon
- Tab icon position alignment i.e., before or after tab title
- Tab borders
- Multiple tab description animations
After you have made the required changes. Click on the Publish button.
After it has been published. Scroll below and copy the tab shortcode.
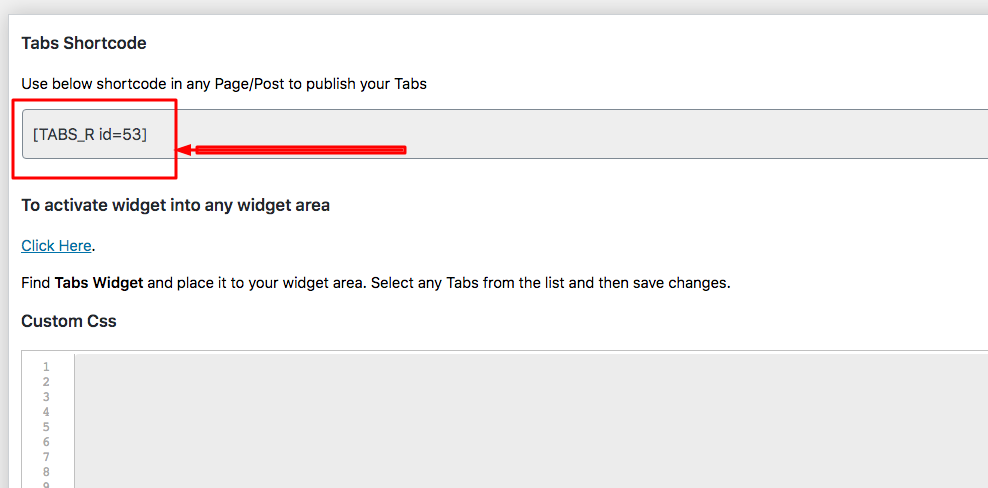
If you want to change the design of tabs, you can use custom css. Just paste the custom css in the css area. If you want to have a custom design for your tabs you can hire GloriousThemes.com
GloriousThemes have a team of WordPress experts that can help you accomplish whatever you want from your WordPress.
Go to the post or page where you want to add the shortcode. If you are using the classic editor you can paste the shortcode directly, but if you are using the Gutenburg editor than search for the shortcode in your editor and paste the shortcode inside it.
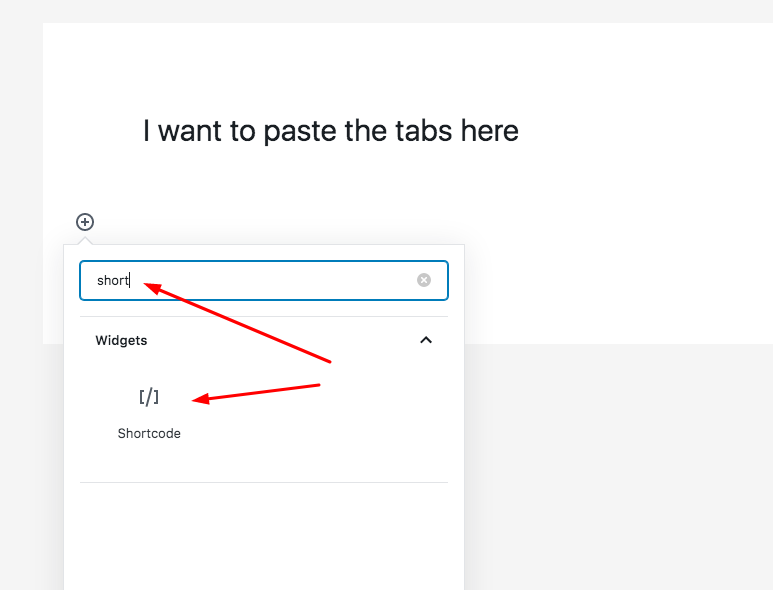
Now paste the shortcode you copied earlier inside the shortcode field.
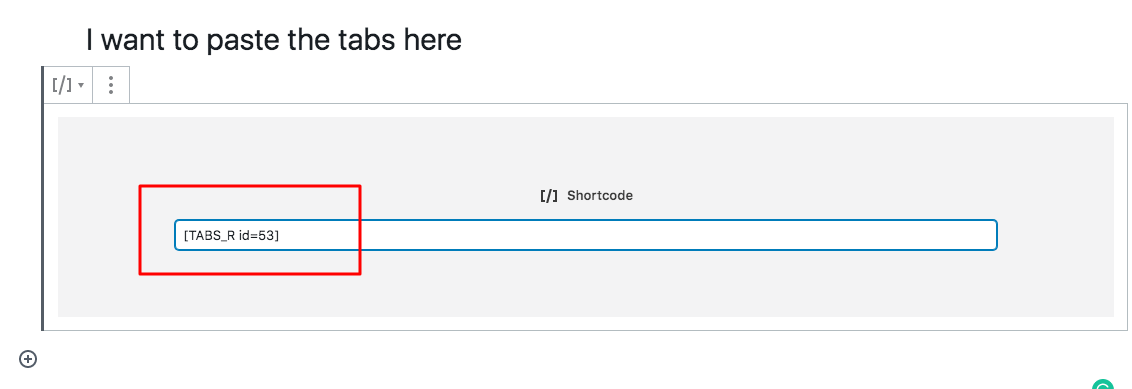
After you have pasted, click on Save Changes/Publish button and view your tabs working on the frontend.
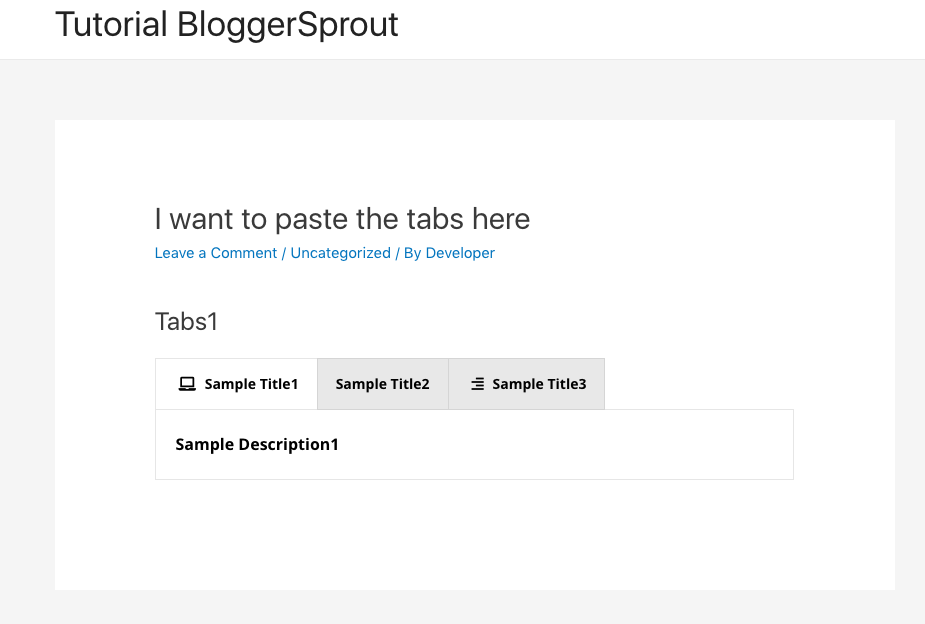
How to add tabs in a WordPress page
If you are searching for the answer to any of these related questions, we have answered it in detail.
- How do I create a custom tab in WordPress?
- How do I edit tabs in WordPress?
- How do I remove tabs in WordPress?
To add, edit or remove tabs in the WordPress page, you can use any of these methods:-
- Using Elementor
- Using Gutenburg
- Using Shortcodes
- Using Plugins
You can use any of these methods to add tabs, edit tabs or remove existing tabs in your WordPress site. Tutorials for each method is given above.
If you are not using any of the above-mentioned methods, we recommend you use the Elementor methods as it allows you to have complete control of the tabs and it also allows you to edit, change and remove the tabs in the future.
Elementor is currently the #1 drag and drop page builder plugin for WordPress.
How do I add a menu tab to my WordPress admin?
Start by clicking on the Categories tab to expand it. You will see your blog categories listed there. Simply select the categories you want to add to the menu, and then click on add to menu button.
Conclusion
As per our experience and votes from the audience and GloriousThemes, we recommend you to use Elementor Pro as it allows you to do whatever you want from your WordPress.
Either it’s about adding tabs or shortcodes in the frontend.
Even in this tutorial, Elementor is the easiest way to add tabs in your WordPress. Click here to buy Elementor Pro.
We hope this article helped you learn how to add tabbed content in WordPress posts and pages. You may also want to take a look at How To Add Live Chat to Your WordPress Website
If you liked this article, then please subscribe to our YouTube Channel for WordPress video tutorials. You can also find us on Twitter and Instagram.

Loved the article