How to Properly Install and Setup WP Rocket in WordPress
Are you looking to speed up your WordPress Website using WPRocket but wondering how to configure it?
Then you are at the right place.
In this tutorial, we will learn how to install and setup WP Rocket and get the best result out of it… And you don’t require any technical Knowledge for it.
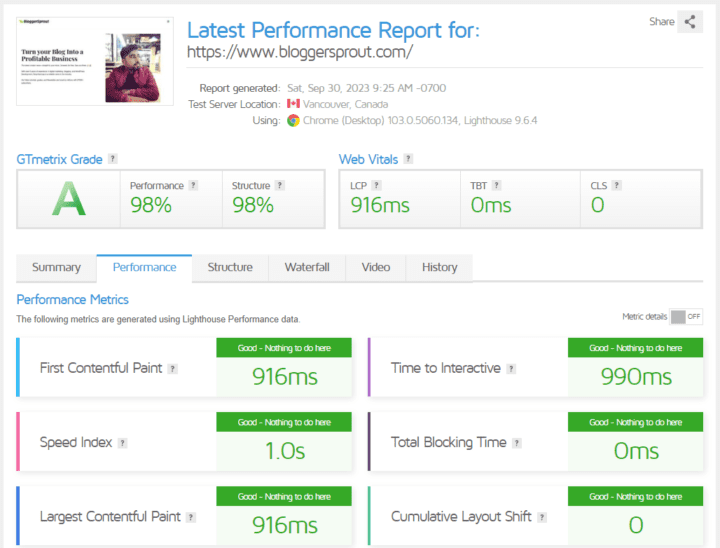
Further, you will also get the secret sauce that professional bloggers and Large businesses use to speed up their website something like this.
Let’s dive in!
Become our Community member to enjoy these perks way before the public knows, Join Income.able community for FREE.
Disclosure: I may receive affiliate compensation for some of the links below at no cost to you if you decide to purchase a paid plan. You can read our affiliate disclosure in our privacy policy.
What is WP Rocket?
Do you like slow websites, No…Absolutely not, and Search engines like Google will hate your website.
So if your website is slow then you should consider WPRocket as is a caching plugin for WordPress and is currently the #1 Caching Plugin in the market. It is being used by bloggers, e-commerce, and SMBs.
WPRocket is simple to use and configure and works straight out of the box, even a non-technical person can use WPRocket and Configure it.
We use WPRocket on all of our websites and we love it and most of WordPress users has WPRocket installed on their website.
Why WP Rocket is Essential?
Having a good pagespeed is a necessity and having slow-loading websites will have the following consequences.
- Lower search engine rankings
- High bounce rates
- Reduced user engagement
- Fewer Conversions
- and several other
So before you make a purchase, you should check this full Unbiased Review of WPRocket
Purchasing and Downloading WP Rocket
First, you need to buy WPRocket as this is a paid plugin. Here’s how you can do it:
- Visit the WP Rocket website – Click Here
- Next, Choose a plan that suits your needs.
- Proceed with the payment.
- Download the plugin: After payment, you will receive a download link for the WP Rocket plugin.
Install and Setup WP Rocket
Once you have purchased WPRocket, and you have the zip file downloaded on your desktop. We can begin installing it.
- Log in to your WordPress dashboard.
- Navigate to the “Plugins” section.
- Click “Add New.”
- Click the “Upload Plugin” button.
- Choose the WP Rocket ZIP file you downloaded earlier.
- Click “Install Now” and then “Activate.”
You have successfully installed WPRocket and now it’s time to configure WPRocket to get the best results out of it.
Configuration & Settings
WP Rocket offers a range of settings to enhance your website’s speed and user experience. Here are the key settings you’ll encounter:
- Cache: Enable caching to speed up your site.
- File Optimization: Optimize CSS, JavaScript, and more.
- Media: Enhance image and video performance.
- Preload: Preload cache for faster loading.
- Advanced Rules: Customize cache settings.
- Database: Optimize your WordPress database.
- CDN: Integrate a content delivery network.
- Heartbeat: Control WordPress Heartbeat API.
- Add-ons: Extend WP Rocket’s functionality.
We’ll go through each of these settings and guide you on configuring them for the best results.
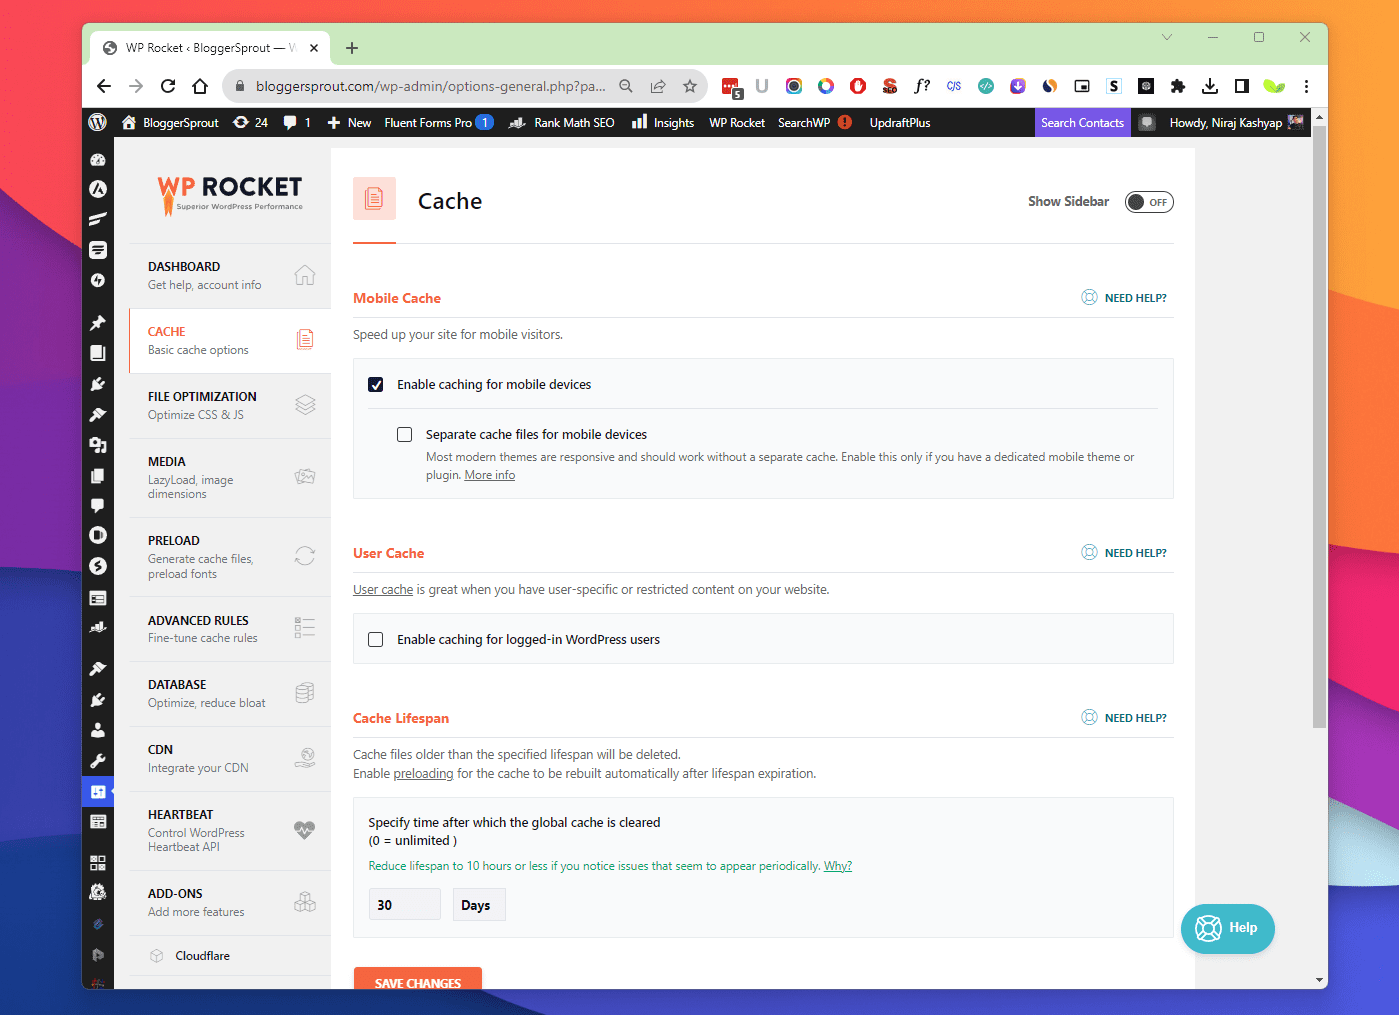
Caching Options
Caching plays a pivotal role in speeding up your website as it creates super-quick copies of your web content – your posts and pages – and serves those copies to visitors instead of the live website itself.
This reduces the need to generate and render the entire post from scratch and the view will have the same experience as the live website.
Picture this: You’re at a cafe, and you order your favorite coffee. Instead of the barista brewing your coffee from scratch every time, they already have a pre-made cup waiting. That’s caching! It’s like having pre-made cups of your website ready to go, so visitors don’t have to wait around for the site to be freshly brewed every time they click on it. It’s a real time-saver!
Caching has a few options to configure.
- Page Caching: Cache entire pages for faster loading.
- Cache Lifespan: Set how long cached files are stored.
- Mobile Cache: Create a separate cache for mobile devices.
- User Cache: Serve cached pages to logged-in users.
These options allow how you want to configure your cache, this setting plays a vital role in your Page Speed.
File Optimization
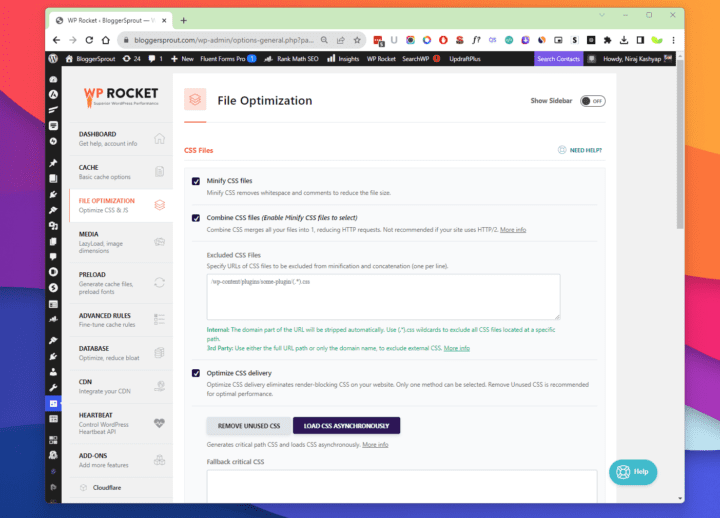
Optimizing your website’s files is crucial for speed as it compresses into fewer files thus reducing the size and turning your website to load much faster.
It’s just like zipping your entire website.
- Minification: Reduce file sizes by removing unnecessary code.
- Combine Files: Merge multiple CSS and JavaScript files.
- Load JavaScript Deferred: Improve page load times.
- Delay JavaScript Execution: Optimize script loading.
Here you need to be careful as if you opt for all the options then your website may seem broken. If it seems broken then you need to play around by unchecking the options.
Media Optimization
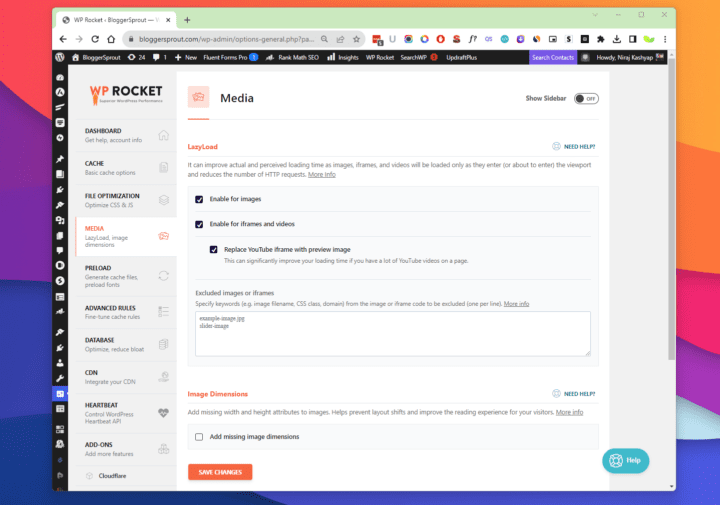
Images and videos are integral parts of modern websites and they are the main culprits for slowing down the website as now Images and videos are in HD, 2K, 4K, and 8K which means their sizes will be much higher.
WPRocket provides a few options to optimize your images:-
- Lazy Loading: Load images and videos as users scroll.
- Image Optimization: Compress and optimize images automatically.
- Content Delivery Network (CDN): Integrate with a CDN for faster media delivery.
But only these features won’t optimize your images, you need to compress and optimize images by reducing their size but not their quality.
You can achieve this manually by compressing each image and then uploading it to your website.
But I love the automatic way, here I use ShortPixel, which is another premium plugin that optimizes, compresses images, converts to the web, and much more automatically.
This gives me the freedom to just upload any image to my website and the rest will be taken care of by this plugin.
Grab ShortPixel at 34% Discount Now, click the button to claim it.
Preload
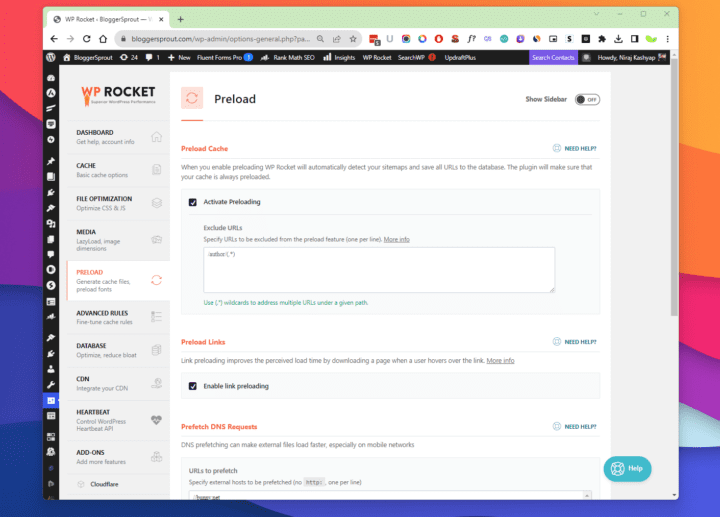
Preloading is a way to tell WPRocket to cache the pages and post. To create a cache of your pages and posts you need to tell the caching plugin to cache the pages.
But WPRocket uses preload technology, it uses your sitemap and tells WPRocket to cache all the links available in your sitemap. A sitemap covers all the links to posts, pages, and media.
So just activate preload and the caches will be built based on the sitemap. You can also prefetch DNS for fonts, CSS, and other websites.
Advanced Rules
If you don’t want certain pages and users to be cached, then this is where you will configure it.
You can set which links, pages, and users are never to be cached and WPRocket will avoid caching it and will deliver the dynamic files of your website.
Database Optimization
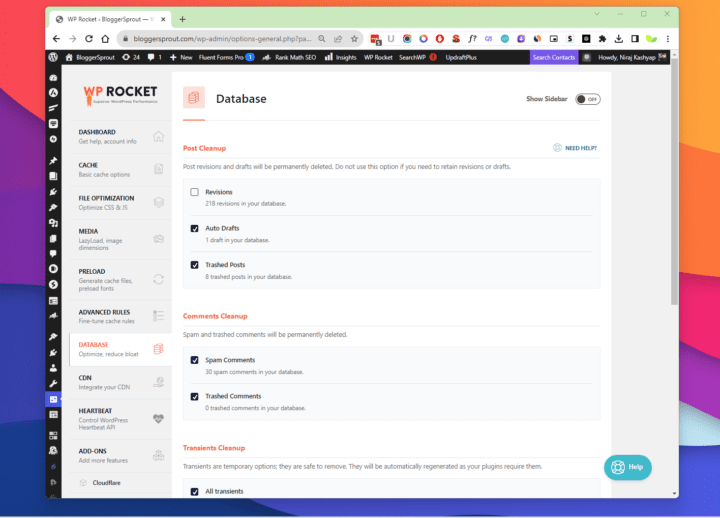
The heart of your Website is its database and it can accumulate unnecessary data over time.
Manually cleaning the database is a high risk as you may corrupt the entire database by just deleting 1 option or certain data.
But don’t worry, WP Rocket offers a few solutions:
- Post Cleanup: Clean up post revisions and drafts.
- Comments Cleanup: deletes spam and trashed comments.
- Transients Cleanup: Transients are temporary options
- Database Cleanup: Remove redundant data.
- Automatic Cleanup: Schedule regular database cleanups.
This will optimize your Database and will drastically impact your website load time.
Content Delivery Network (CDN) Integration
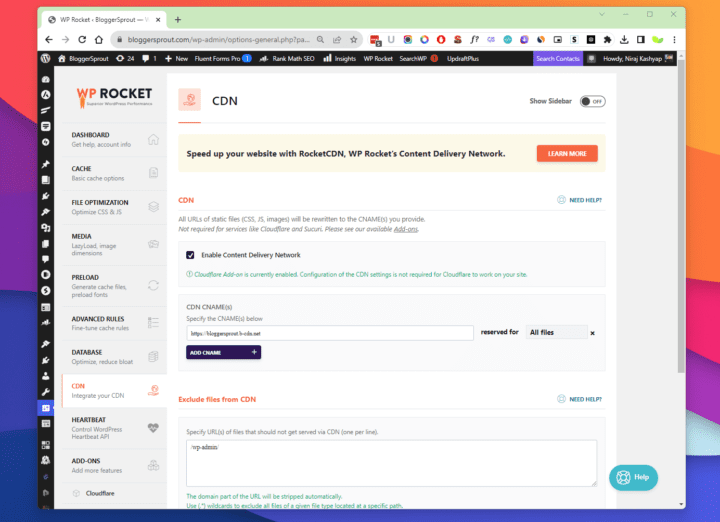
Integrating a CDN with WP Rocket can take your website’s speed to the next level:
A CDN is a Content Delivery Network, in simple words, it is a mirror server that stores your website files in several servers across the globe.
When a user visits your website, it loads your website files from the nearest server instead of using your original server.
On BloggerSprout, we use Bunny CDN which is the world’s best and affordable CDN. It charges you based on your usage rather than a fixed billing. Thus making it the perfect CDN for bloggers and SMBs.
Join Bunny CDN now and get $10 FREE.
Heartbeat
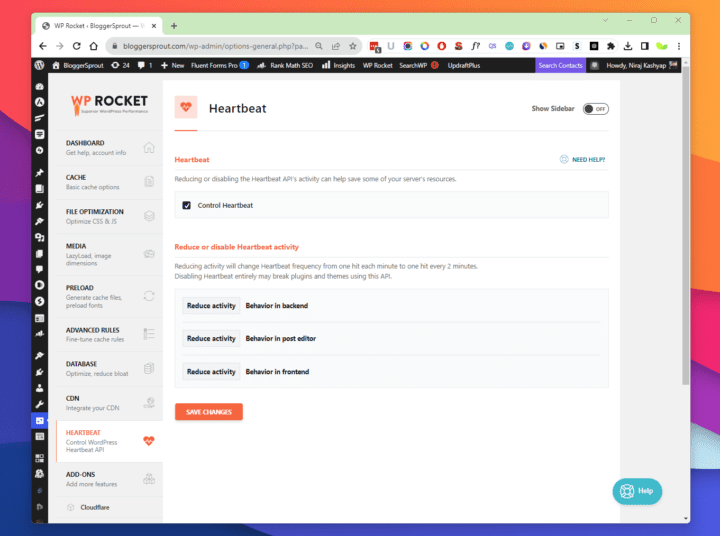
WordPress has a heart and it beats every minute. Its task is to check whether everything is working perfectly and all the tasks like scheduling, future updates, and the cron jobs are executed on time.
In simple it’s the engine of your entire website that keeps your website up and running.
By reducing the heartbeat you can improve the performance of your website and save some resources on your hosting.
Addons
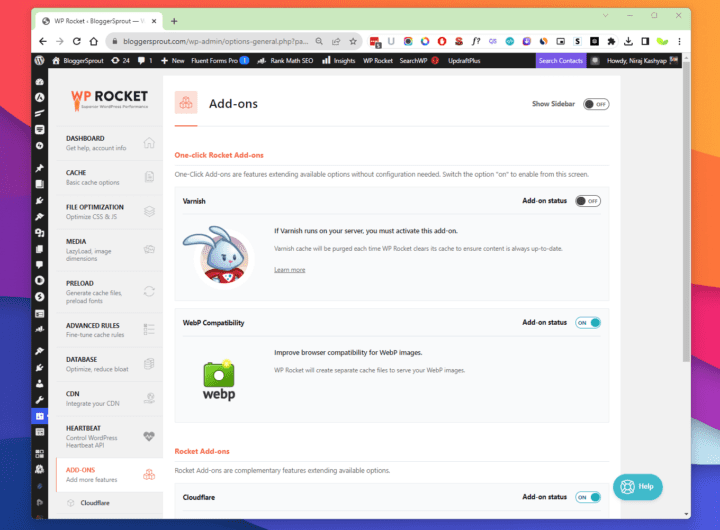
WPRocket has a few add-ons that help you to sync with the apps you might be using.
- Varnish: if your server supports varnish then you can automate it through WPRcket
- WebP: Creates a separate cache for your WebP images.
- Cloudflare: Purges the cache of Cloudflare automatically
- Sucuri: Sync sucuri cache to clear with WPRocket.
Testing Website Speed
After configuring WP Rocket, it’s essential to measure the improvements. Here’s how you can do it:
- Website Speed Testing Tools: Use tools like Google PageSpeed Insights, Pingdom, or GTmetrix to evaluate your site’s speed.
- Comparing Results: Compare your website’s speed before and after installing WP Rocket.
- Monitor Metrics: Pay attention to key metrics like page load time, TTFB (Time to First Byte), and PageSpeed scores.
- User Experience Testing: Ensure your website feels snappy and responsive during real user interactions.
Troubleshooting Common Issues
While WP Rocket is user-friendly, you may encounter some issues along the way like:
- Plugin Conflicts with other plugins.
- Error Messages encountered during setup.
- Website seems broken
- Pagespeed is not improving
If any of these happens, you can contact their team and get professional help.
Conclusion
In conclusion, WP Rocket is a game-changer when it comes to optimizing your WordPress website’s speed and performance. By following the steps in this guide, you can install and set up WP Rocket to ensure your website loads lightning-fast, providing an excellent user experience and boosting your search engine rankings. Don’t wait; take action today and watch your website soar to new heights
Frequently Asked Question
FAQ About WPRocket


Stuck Somewhere, Have a doubt, Need some Help…All you need is to comment below…