How To Add Products in WooCommerce
There are four product types in woocommerce and they all follow pretty much the same procedure when it comes to creating a new product. you have to add the product name its price, its description, inventory, and other attributes if necessary.
To add a product in WooCommerce
- Goto WooCommerce>Products>Add Product. Enter the product Name and Description
- Goto Product Data Panel and Choose then Product Types and Fill the Product Data meta boxes.
- Depending on the Product Data Type you choose. Some additional fields may appear, just fill the relevant data.
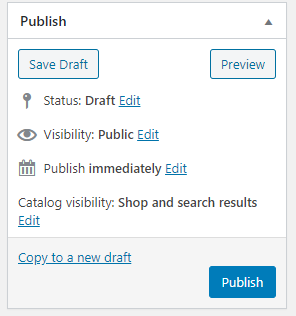
- Click on Publish Button to Make the Product available for the Public.
Once you have installed WooCommerce and have gone through the setup wizard and your settings are ready, you can add your first product.
To add your first product you will need all the required information to fill in the meta boxes.
So I have created this tutorial to lend you a helping hand in Creating your first product in WooCommerce
Below you will find a step-by-step process and how to add the first product depending on what kind of product you are choosing and properly configuring each and every little detail.
GloriousThemes helps website owners, agency partners, and freelancer partners fix WordPress errors and other security issues. Whether you need us to manage your WooCommerce Store or Design it. We are here for you. – Contact GloriousThemes.com
Disclosure: I may receive affiliate compensation for some of the links below at no cost to you if you decide to purchase a paid plan. You can read our affiliate disclosure in our privacy policy.
What is WooCommerce
WooCommerce is a free extension/ plugin for WordPress that allows you to sell any kind of product online using your website.
We also have a complete in-depth guide on how to create a complete eCommerce website using woocommerce.
WooCommerce powers around 7% of all online stores and 22% of the top 1 million eCommerce sites. Ecommerce sales are booming, so if you’re looking to open up shop on your WordPress-powered website, going with WooCommerce is one of the best decisions you could make.
How To Add Products in WooCommerce
Add a product in woocommerce the process is very simple. You need to fill in the Title of the product, Description, Taxonomies, and all the requirements of meta boxes. However several people get confused even I did get confused when I was using it for the first time.
WooCommerce allows you to add different product types. It doesn’t matter if you want to sell a simple physical product like it T-shirt, a group product like a phone and charger, A virtual product like SEO service, a downloadable product like an eBook or software, an external / affiliate product like amazon affiliates or variable products like a Tshirt with different sizes and colors.
However, apart from these different product types option, there are a few common things that you will get in all. The common fields and options are our product images, taxonomy, SEO, attributes, etc.
Different Options of Product Types
Here are the different options of product types offered by WooCommerce. Each type is used for a specific purpose and I have covered all the required information for each type
- Simple:- this covers the vast majority of any physical product. in this type, you don’t have the option of creating a variable like size or color. For example a book.
- Grouped:- this is a collection of products that are sold together. like 3 pairs of socks with different colors or a group consisting of a Phone, Charger, and a Headphone.
- Virtual:- It covers any product that cannot be touched. Like an SEO Service. It also doesn’t require shipping charges.
- Downloadable:- It covers the products that are downloadable like a Software, Magazine, a Photo, etc
- External / Affiliate:- it allows you to change the link of the button to redirect to another website instead of forwarding to the cart.
- Variable:- a product with variation, each may have a different SKUs, Size, Price, Stock, color, etc. For example, T-Shirts with different sizes and colors.
WooCommerce Products Common Fields
Every woocommerce product has this things in common. If doesn’t matter if you are adding a digital product, a physical product, or an affiliate link product.
So I recommend you add this details first and then move to the Product Types to make the process simpler and to avoid missing any information.
1. Add Product Title and Description
Enter the name of the Product in the Title Section. It should be short and catchy.
Next, add the description of the product and try to cover the complete details of the product so that your customer find it easy to get all the information about the product.
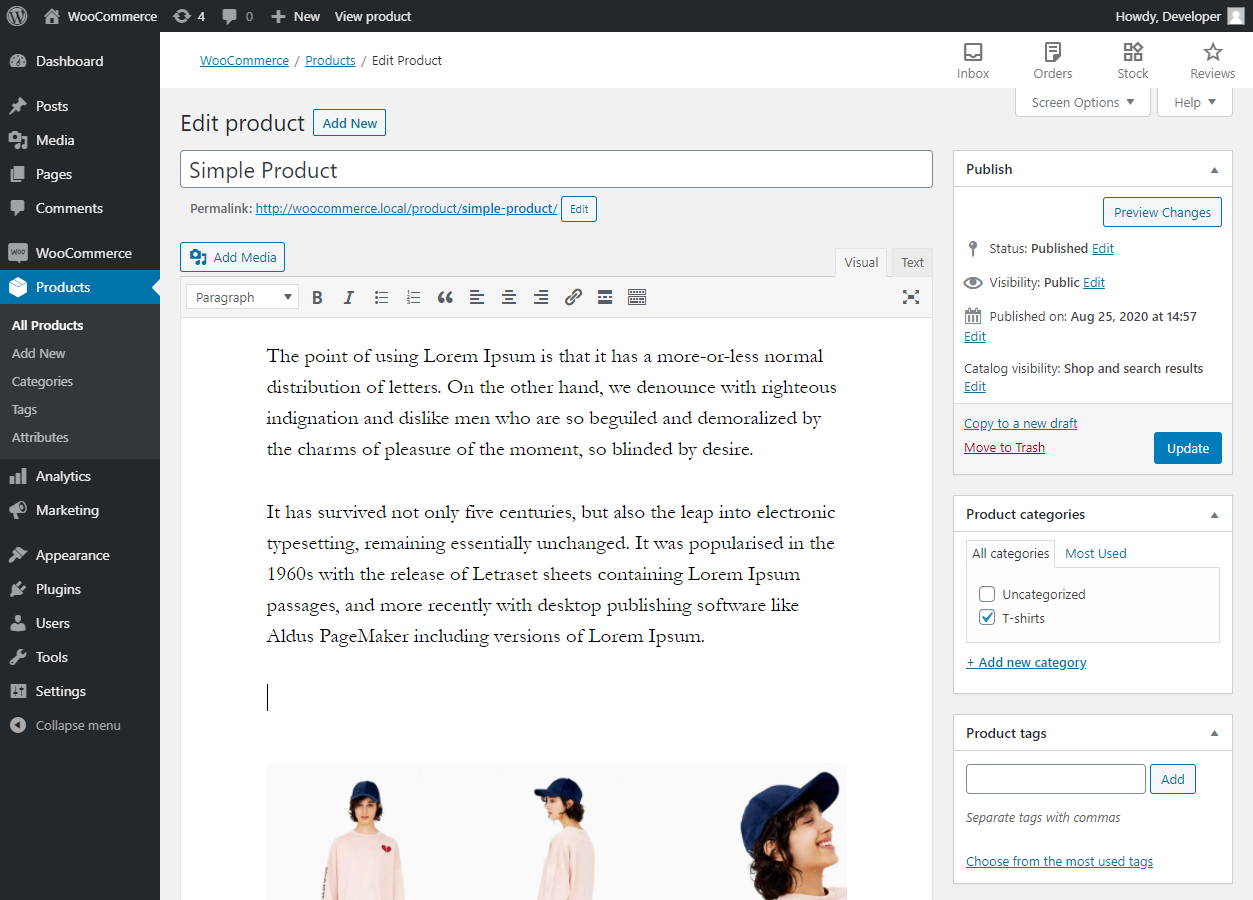
Make it long and show the advantages, benefits, and pros of your product. Try to use images and bullet points to make it more appealing.
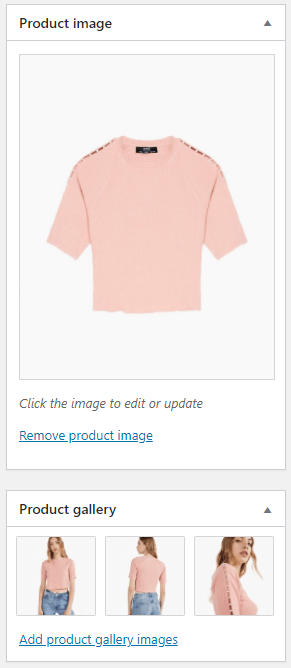
2. Product Images
In wordpress post, you have heard about the featured images. It is the same thing with woocommerce. The Product image is the main featured image that will be visible to your customer if they are viewing your product on the shop page or if you have shared a link on the social networks.
Try to have a specific size for all your woocommerce product images and if possible make the background white or use vibrant color.
This helps in attracting the customer’s attention to the product and helps in more conversions.
Something like this
Need help with WooCommerce: Contact WordPress Experts from GloriousThemes.com
3. Product Categories ( Taxonomies )
If you add any product to your store, if would definitely fall under a specific category and taxonomy.
The more you use taxonomies, it becomes much easier for you and your customer to filter your products.
If I take an example of a clothing store, I can create taxonomies like T-shirt, Shorts, Trousers, Polo, etc.
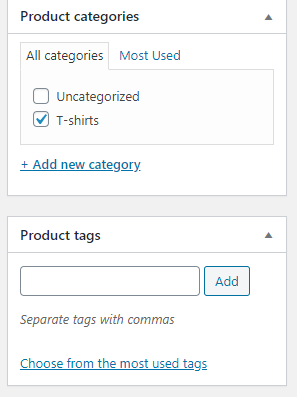
This helps the store manager/owner to maintain the store and the customer to filter and view all the products of a certain category.
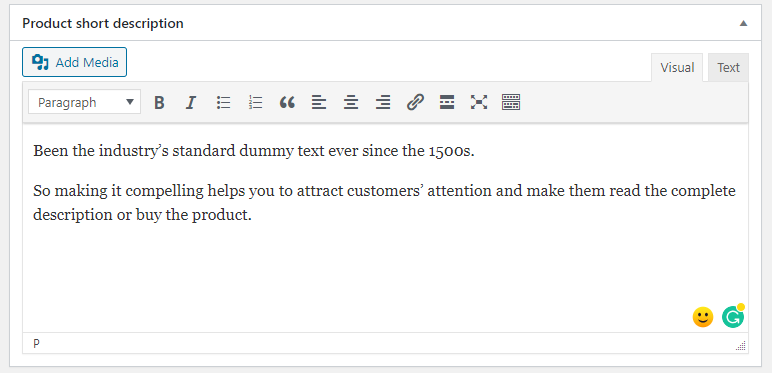
4. Product short description
Try to be creative and make a compelling short description. This appears just after the Product title and the featured image.
So making it compelling helps you to attract customers’ attention and make them read the complete description or buy the product.
Simple – Adding a simple product
The simple product has no variation options and is the most used product type for woocommerce. But the Simple Product Type also offers 2 checkboxes:-
- Virtual
- Downloadable
I will elaborate this 2 types in the below sections.
After filling the common details like the Product Name, Description, Categories and tags, Images, etc. We are left to add the Product Data Meta Box infomation.
The simple product type has 6 Tabs:-
- General
- Inventory
- Shipping
- Linked Products
- Attributes
- Advanced
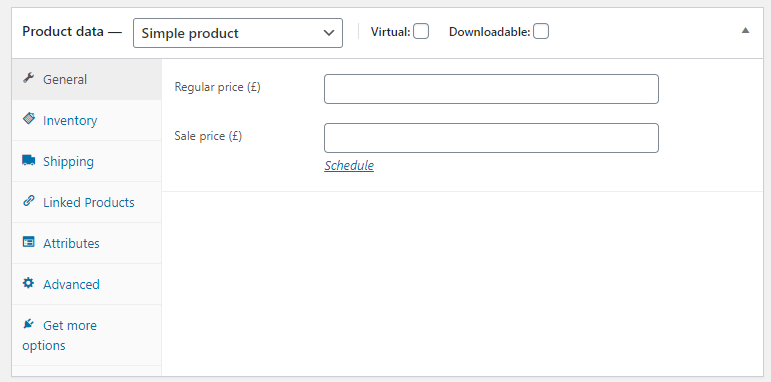
#General Tab
This tab allows you to add the Price of the product. It has 2 fields:- Regular Price and the sale Price.
The regular price is the maximum price of a product while the sale price is the discounted price of the product.
The sale price always needs to be lower than the Regular Price.
#Inventory Tab
The inventory tab allows you add the SKU of the product and also to manage stocks. You can show the stock status of the product to the customer and alert them if the stock has finished.
It also give you the option to sell a product individually. Which means other products can’t be bought while this item is in cart.
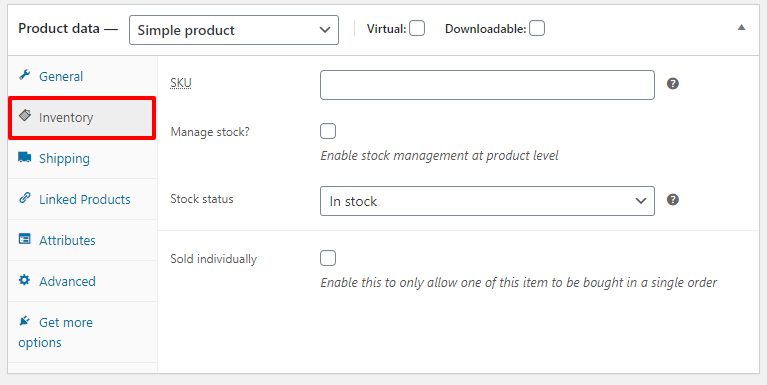
This option is mostly used if someone buys a bundle of a product and you don’t want the customer to order to buy non-bundle products with it.
#Shipping Tab
If you are shipping the product to the customer than fill the details in this tab. This information will be visible to the customer along with other product information.
The shipping tab includes the following data:-
- Weight (KG) – The weight of the product in kilograms.
- Dimensions (cm) – The height, Width and the Length of the product in centimeters.
- Shipping class – This is a settings section, which you have to define while setting your woocommerce. This field is mostly used for options like “Free Shipping“, “OverNight Shipping“, “Fast Shipping“, “Cash on Delivery“, etc.
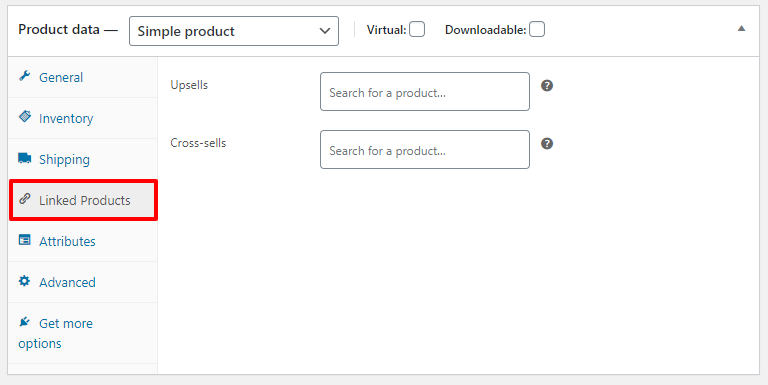
#Linked Products Tab
If you want to upsell or Cross-sell another product with this product, then this tab is used. Most of the WooCommerce theme uses its own theme functions to show related products.
However, you can override it by choosing your own products as upsells and Cross-sells which will be visible as Related Products in the product details.
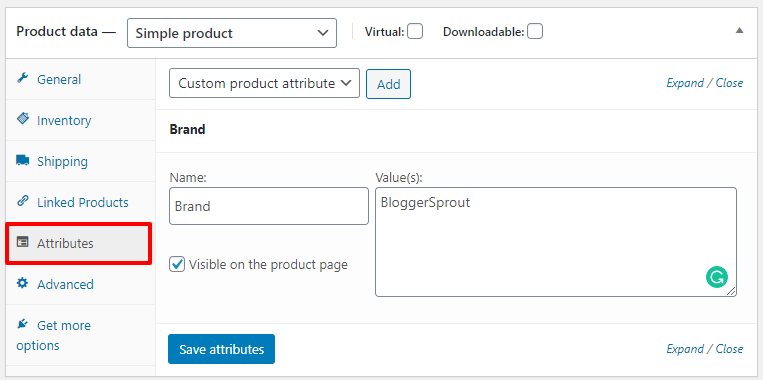
#Attributes Tab
This tab allows you to add extra product information which will be visible in a table format. This field mostly contains information about the product like:-
- Brand
- Size
- Color
- Return Period
- etc
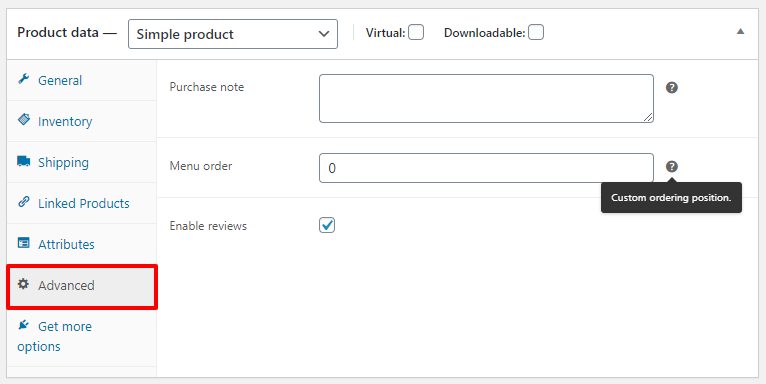
#Advanced Tab
This tab is very rarely used. It is mostly used to show a Purchase note to the customer and the Store manager and enable the option of Product reviews.
That’s it.
This is how you create a product in Woocommerce or add a new product in Woocommerce. After you are done filling all the information, you need to click on the publish button, to make all the changes visible to your customer.
Grouped – Adding a Grouped product
The Group products allows you to sell several individual products together. As the name suggest Grouped Product.
To create a grouped product
- Goto WooCommerce>Products>Add New and Select “Grouped Product” from the Product Data Meta box.
- Fill the required product details like Title, Description, Categories, Images, etc.
- Now Click on Grouped Product Tab and Type the name of the products you want to add as a group.
- WooCommerce will automatically handle the price and shipping details. Click on Publish, once you have added all the information.
You will have the capability to group several products from your store to be sold together with just a click of a button.
This option removes the General tab and the Shipping tab, While the Inventory tab changes to only allow SKU.
The Linked Product Tab now has a new field ” Grouped Products” and the cross-sells option is removed.
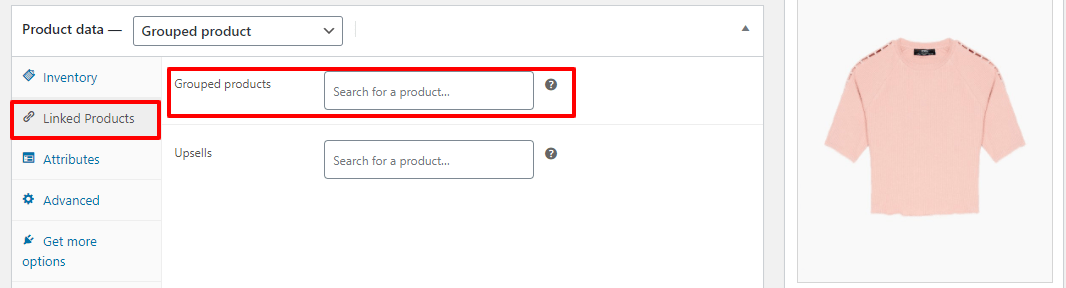
Type the name of the product that you wanted to be grouped, in the grouped products field. Add it and the WooCommerce will automatically calculate the Price and the Shipping.
The other tabs which are Attributes and Advanced remain the same as it was in Simple Product Type.
Virtual – Adding a Virtual product
A virtual product is something that can’t be shipped to the customer and it cannot be touched. Most of the time, a virtual product is a service.
To add a Virtual Product in WooCommerce:-
- Goto WooCommerce>Products>Add New and select “Simple Product” from Product Data and check the checkbox – Virtual
- Fill the Product information like Title, Descriptions, Images, and Product Meta Informations Like Price, Inventory, Linked Products, etc
- Click on the Publish button.
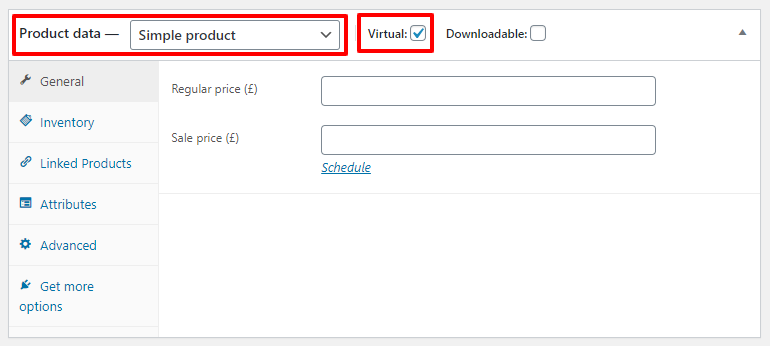
The other information like the General, Inventory, Linked Products, Attributes, Advanced all remains the same. So you can follow the above information on what information to add in these tabs.
The Shipping tab is removed as a virtual product doesn’t need to be shipped.
Downloadable – Adding a Downloadable Product
A Downloadable product is a product that is intangible and the customer wants to download it. Most of the products in this category are software, magazine, photo and something similar.
To add a Downloadable Product in WooCommerce:-
- Goto WooCommerce>Products>Add New and select “Simple Product” from Product Data and check the checkbox – Virtual and Downloadable.
- Fill the Product information like Title, Descriptions, Images, and Product Meta Informations Like Price, Inventory, Linked Products, etc
- Click on the Publish button.
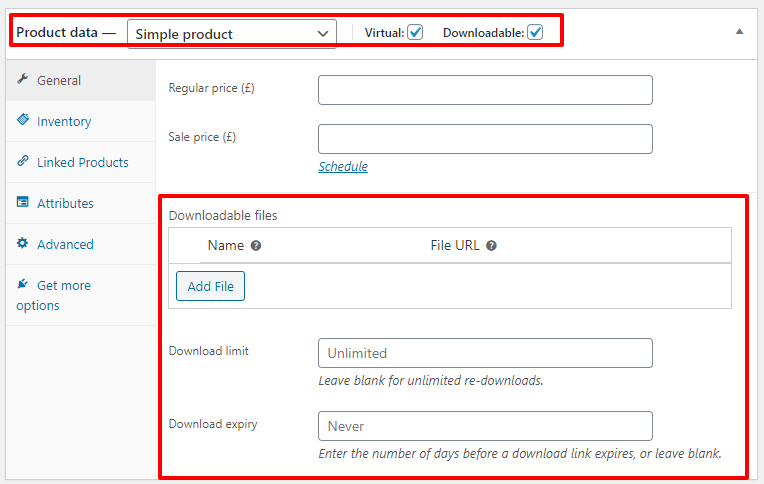
Checking the checkbox ” Downloadable” adds new fields under the general tab. The fields are:-
- Downloadable files:- Allows you to add any file from your media library as a downloadable product, which customer gets access to download after purchasing the product.
- Download Limit:- It limits the number of times a customer can download the file.
- Download Expiry:- The time after which the downloadable link expires and the customer cannot download the file from that link anymore.
You can manage other related information like the Inventory, linked Products, Attributes, and Advanced which is the same thing which is covered in Simple Product Type.
External or Affiliate – Adding an External product
If you are selling or promoting another product or an affiliate product than this tab is where you can achieve it.
To add a External / Affiliate Product in WooCommerce:-
- Goto WooCommerce>Products>Add New and select “External/Affiliate Product” from Product Data.
- Fill the Product information like Title, Descriptions, Images, and Product Meta Informations Like Price, Inventory, Linked Products, etc
- Click on the Publish button.
After you choose the “External/Affiliate Product” some New fields appear under General tab while several fields from other tab disappears.
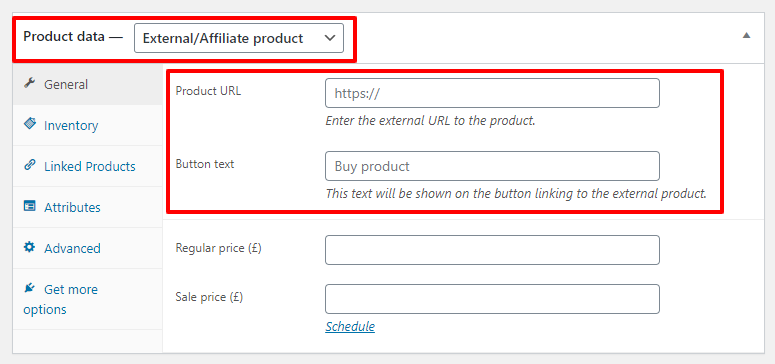
Several Fields are modified in this Product Data Type:-
#In General tab
In general tab, 2 new fields are added. Product URL and the Button Text. This allows you to send the customer to another website and show a custom text instead of add to cart button.
Product URL:- Add the link of the website or the affiliate link that you want the customer to visit when they click on the products Button.
Button text:- This text will be replaced with the default text of the Product Button (Add To Cart). You can add text like Purchase on Amazon, Visit The Website, Subscribe, or anything that you think of.
Variable – Adding a Variable Product
A variable product means a product which has several variation. Example: Lie a T-Shirt with several colors and Sizes.
You can have separate stock for each size and color and the price may also vary.
To add a Variable Product in WooCommerce:-
- Goto WooCommerce>Products>Add New and select “Variable Product” from Product Data.
- Fill the Product information like Title, Descriptions, Images, and Product Meta Informations Like Price, Inventory, Linked Products, etc.
- Click on Attributes and Add the Data like the Size and Colors, and mark them to be used as a variation.
- Next, click on variations, and choose “Create Variations from all Attributes” and click on the Go button
- WooCommerce will automatically create variations for all the attributes you have filled in the Attributes tab.
- Fill the Individual data like Price and stock.
- Click on the Publish button.
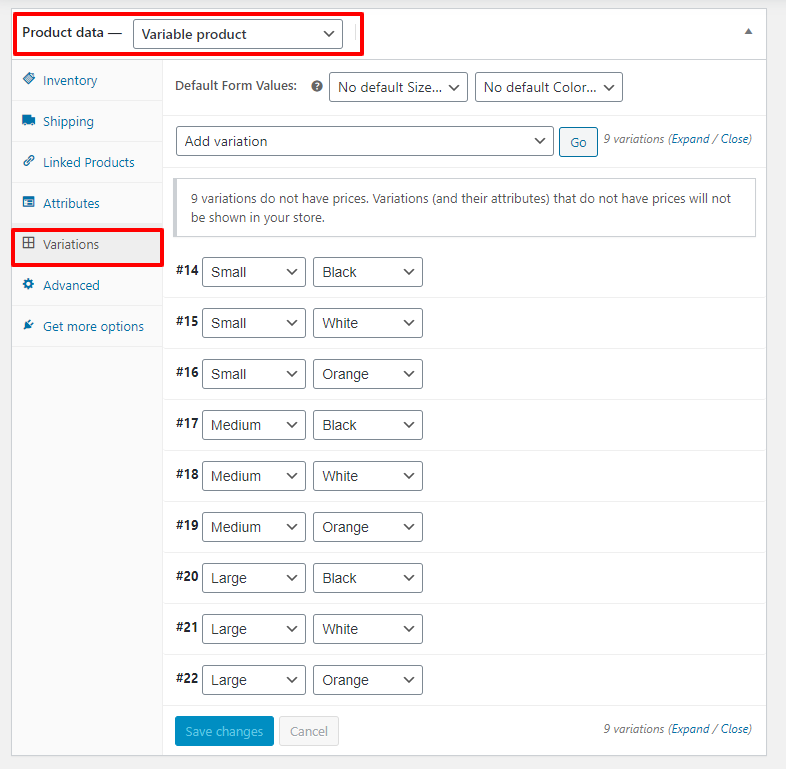
Once you have created the variations, Click on each variation. This will give you several fields that you can control for each individual variation you have created.
Start filling the relative data into each field like the Price, Stock, Weight, and Shipping. Thus allowing you to have different Prices and Stocks based on each variation the customer chooses.
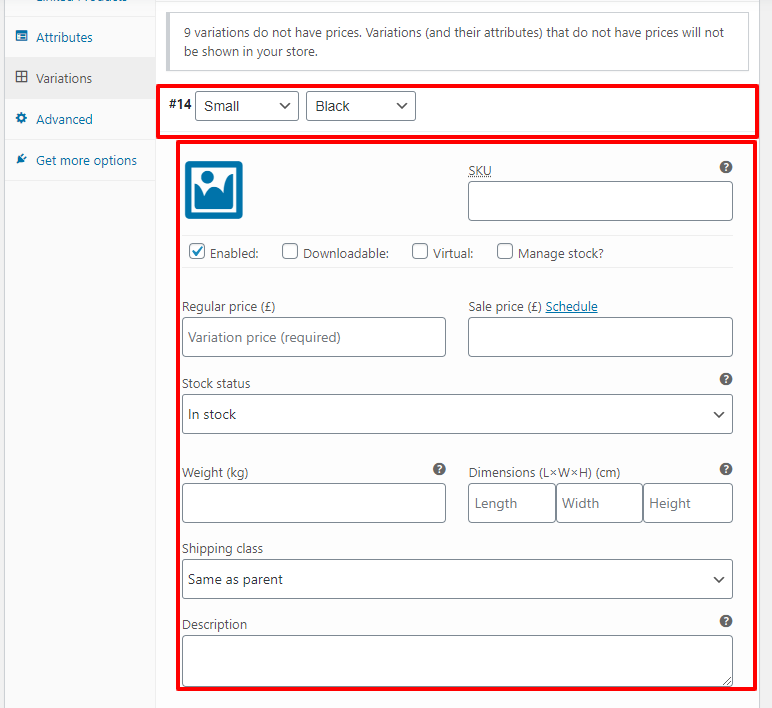
Click on Publish button, to make your variations available for the public.
Need Help With WooCommerce
GloriousThemes helps website owners, agency partners, and freelancer partners fix WordPress errors and other security issues. Whether you need us to manage your WooCommerce Store or Design it. We are here for you. – Contact GloriousThemes.com
All my websites are maintained by the WordPress Experts from GloriousThemes and i just focus on Blogging.
FAQ
Conclusion
I hope by this tutorial, You are now able to create/add a product in woocommerce and understand what each field and tabs are responsible for.
If you have any queries, comment below with your questions and I will answer them for you.
So Did you Add your First Product in WooCommerce successfully? Answer in the comment.
You can also subscribe to our YouTube and Like and Follow us on Facebook, Twitter and Instagram.