How To Test Woocommerce Checkout
Woocommerce is the #1 WordPress eCommerce Plugin and many websites use this plugin to sell their own products on the web. But since you need to set up the WooCommerce all by yourself which leaves space for mistakes.
In order to avoid big mistakes in payment and authentication, you need to test WooCommerce checkout.
To test the WooCommerce checkout, you will need to go through these steps:-
- Create a Sample products.
- Order the sample product using a demo customer account
- Checkout using the payment gateway.
So in this article, I will show you how you can test WooCommerce checkout with any payment gateway by following this simple and easy step-by-step guide.
Recommended: We recommend Yith WooCommerce Stripe Plugin – Download Now
Disclosure: I may receive affiliate compensation for some of the links below at no cost to you if you decide to purchase a paid plan. You can read our affiliate disclosure in our privacy policy.
Easy Steps to Test WooCommerce Checkout
If you have already set up your entire WooCommerce store the testing your WooCommerce checkout process is very simple and easy.
But if you have not set up your WooCommerce store then you can follow this guide on How to Create an eCommerce Website or Buy the Course – How to Create an eCommerce Store with WooCommerce, which included SEO, Security, Backup and much more.
So, I assume you have already set your WooCommerce Store, if not click the above below. Now let’s start testing our WooCommerce checkout page before offering it to the public.
1. Installing & Activating Payment Gateway
Payment gateway depends on your choice and the country you are offering your e-commerce services. Since there are a lot of payment gateways, we are going to use Stripe Payment gateway.
So after installing WooCommerce and Stripe Payment Gateway you need to follow the following steps:-

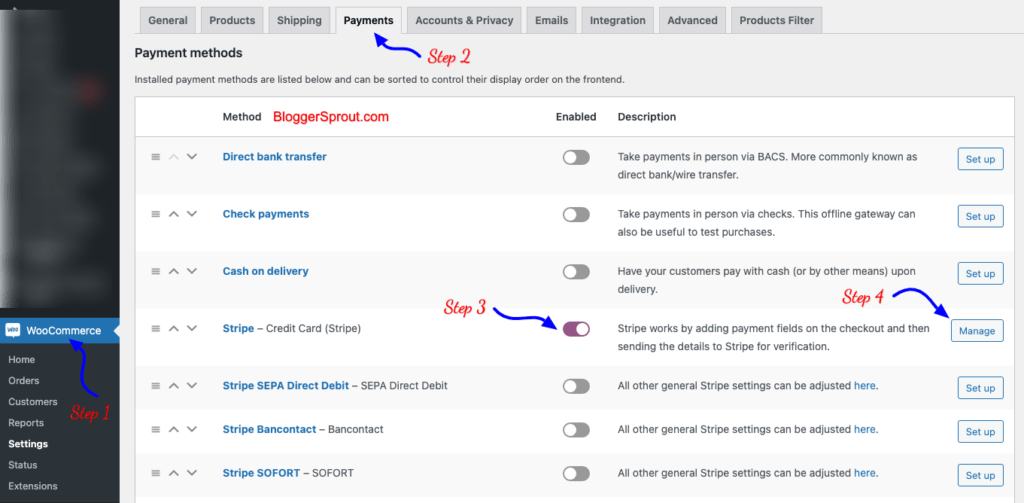
- Visit WP-Admin -> WooCommerce -> Settings -> Payments
- Choose Stripe and click on Manage button
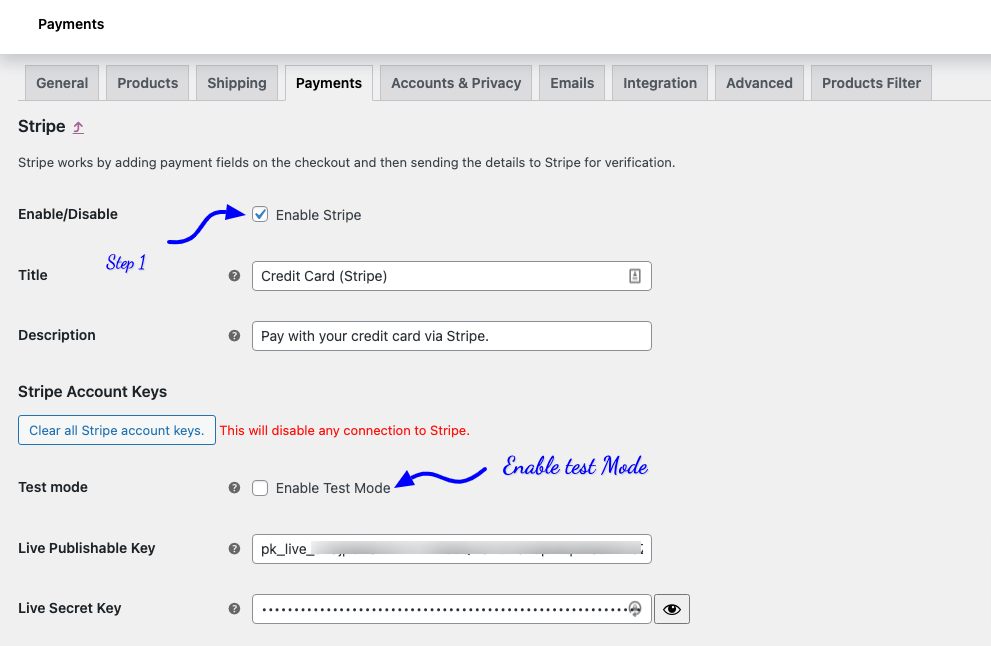
- Enable the Stripe by clicking the checkbox.
- Next is to enable the Test Mode
- Enter the API Key and Save it.
- Test your Checkout.
2. Turning on the Test Mode on the Payment Gateway

Once you enable the stripe payment gateway, you need to check the box where it says, Enable test mode.
Now fill the “Test Publishable Key” and “Test Secret Key“.
To get your own API keys, you need to follow these simple 5 steps.
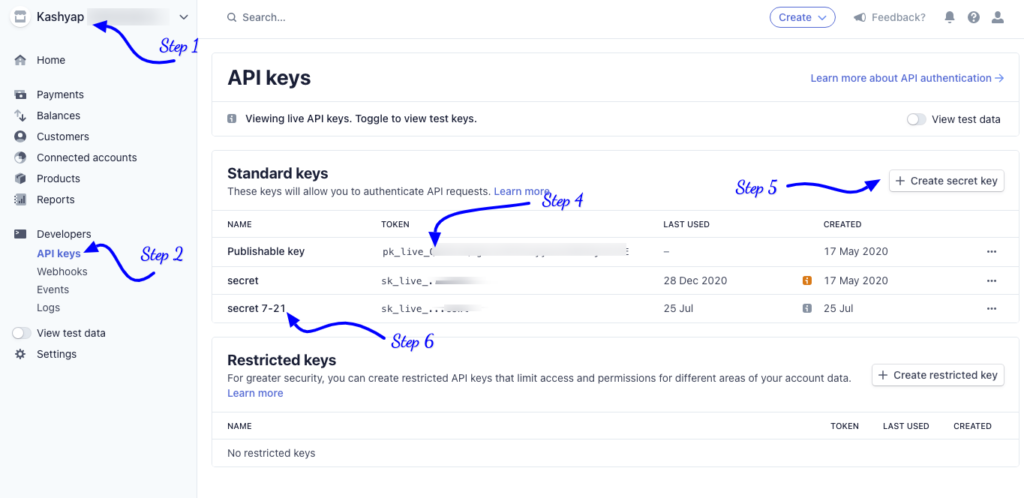
- Login to Stripe and Choose your Business Profile
- Click on API Keys under Developers Menu.
- Copy Publishable Key and paste it in WooCommerce “Test Publishable Key“.
- Now Click on Create Secret Key and Give it a name.
- Copy the Secret Key and paste it in WooCommerce “Test Secret Key“.

Click on the Save Changes button.
Now you are ready to make a test purchase and test the WooCommerce Checkout Page.
Do You Know: Learn how you can customize WooCommerce Checkout Page using Elementor.
3. Making a Purchase with a Demo customer account on Test Gateway
So all the settings are done now. All you need to do is to go and buy a product with new customer details and use a new demo credit card as your payment method.
Every payment gateway has its own test credentials and card details that you must use to make a purchase in a test account.
So to make a purchase with a demo customer account and by using test credentials are as follows:-
- Visit your website in a new browser or Incognito tab, where you are not logged in.
- Click on any product and then add it to cart
- Next checkout
- Fill Demo / test details for a new customer account
- Fill the credit card test credentials
- Click on Purchase Button.
If the purchase went successful then the payment gateway is working fine and now you need to disable it to accept real payments from your customer.
Test WooCommerce Checkout on Stripe
As of now, you have completed the setup of WooCommerce Payment Gateway and you will be using Stripe as your default payment gateway.
For testing the payment gateway using stripe, you will need the test card numbers. I have listed down all the test card numbers possible.
| Number | Card Brand | CVV | Valid Date |
| 4242 4242 4242 4242 | Visa | Any 3 digit | Any date in the future (mm/yy) |
| 4000 0566 5566 5556 | Visa (debit) | Any 3 digit | Any date in the future (mm/yy) |
| 5555 5555 5555 4444 | Mastercard | Any 3 digit | Any date in the future (mm/yy) |
| 5105 1051 0510 5100 | Mastercard (prepaid) | Any 3 digit | Any date in the future (mm/yy) |
| 3782 8224 6310 005 | American Express | Any 3 digit | Any date in the future (mm/yy) |
| 6011 1111 1111 1117 | Discover | Any 3 digit | Any date in the future (mm/yy) |
If you want to test International transactions then you can use the following cards given below.
| Number | Country |
| 4000 0003 6000 0006 | Australia (AU) |
| 4000 0007 6000 0002 | Brazil (BR) |
| 4000 0012 4000 0000 | Canada (CA) |
| 4000 0025 0000 0003 | France (FR) |
| 4000 0027 6000 0016 | Germany (DE) |
| 4000 0037 2000 0005 | Ireland (IE) |
| 4000 0038 0000 0008 | Italy (IT) |
| 4000 0048 4000 8001 | Mexico (MX) |
| 4000 0055 4000 0008 | New Zealand (NZ) |
| 4000 0072 4000 0007 | Spain (ES) |
| 4000 0082 6000 0000 | United Kingdom (UK) |
| 4000 0582 6000 0005 | United Kingdom (UK) – Visa Debit |
Card Details are taken from WooCommerce.
Test WooCommerce Checkout on PayPal
PayPal also has a Test mode but the process is difficult. Because you have to obtain a new email and password to log in to a test account on Paypal.
To do this, you need to log in to your PayPal account and go to settings, and then developer. Then enable the test credentials.
Now visit the test website and register and get your login id and password along with the API and other essential details.
The settings process is the same as stripe. You need to check the test box and then fill the test credentials.
Visit your store in a new incognito window and then click on a product and checkout it using Paypal as payment gateway.
If your test transactions went successfully then your Paypal payment gateway is ready to be used for real transaction.
Test Manual Captures on WooCommerce
To test a card payment authorization with manual capture:
- Go to Payments > Settings.
- Enable Manual Capture.
- Complete the steps to Test Card Payments.
- Go to WooCommerce > Orders.
- Click the order ID of the order created with a test card.
- Confirm the order has a note saying: A payment of $xx.xx was authorized using WooCommerce Payments.
- Click Choose an action.
- Click Capture charge.
- Click Update.
- Confirm the order has a note saying: A payment of $39.00 was successfully captured using WooCommerce Payments.
- Go to Payments > Transactions.
- Confirm a transaction with type Charge is listed.
Final Thoughts
That’s all.
However, your needs may be different from mine. Which plugin is your favorite, and are you currently using it on your site? Do you have any other recommendations to add? Please voice your thoughts in the comments below!
You can also subscribe to our YouTube and Like and Follow us on Facebook, Twitter, and Instagram.


